Tag: wordpress

  • How to Fix Mixed Content Issues in WordPress

    How to Fix Mixed Content Issues in WordPress

    Have you ever wondered why you don’t see a green padlock next to your site URL, even with an SSL certificate installed?

    This issue occurs when your site has one or more resources loading via HTTP instead of HTTPS. These resources could be scripts, images, videos, or any other elements displayed on your site. 

    In this article, we will guide you through the steps to fix mixed content errors in WordPress, ensuring your site is secure and fully functional.

    What is Mixed Content?

    Mixed content happens when a secure webpage, which should be safely loaded over HTTPS, still serves resources (like images, stylesheets, and scripts) over an insecure HTTP connection. This inconsistency can cause security warnings, browser blocks, and a poor user experience.

    Why Fixing Mixed Content Errors is Important?

    If you’ve ever encountered security warnings or missing padlocks on your website, you might be dealing with mixed content issues. Fixing these problems is crucial for several reasons:

    • Security: Mixed content undermines the security of your site. While HTTPS ensures encrypted communication, HTTP-loaded resources can be intercepted or altered by attackers.
    • SEO: Search engines like Google prefer secure sites. Mixed content can negatively impact your SEO rankings.
    • User Trust: Security warnings can deter visitors, reducing their trust in your site.

    How to Identify Mixed Content Errors?

    1. Using your Browser Console

    Most browsers will flag mixed content errors. Open the developer tools (F12 or right-click and select “Inspect”), go to the console tab, and look for mixed content warnings.

    identify mixed content errors with browser console
    identify mixed content issues with browser console
    identify mixed content errors with browser console

    2. Using Online Tools

    Use tools like Why No Padlock? or SSL Labs to scan your site for mixed content errors.

    identify mixed content errors with online tools

    3. Plugins

    WordPress plugins like Better Search Replace or SSL Insecure Content Fixer can help identify mixed content by scanning your database and site content.

    Fixing Mixed Content Errors

    Before proceeding with any of the changes described, make sure to back up your website. We’ve previously covered 3 methods to back up your WordPress website in an earlier blog article.

    1. Update the WordPress Settings 

    The first step to address mixed content errors is to update your WordPress settings. Completing this step will help prevent future mixed content issues. Here’s how:

    1. Log in to your WP admin dashboard.
    2. Navigate to the Settings menu.
    3. Change the 1. WordPress Address (URL) and 2. Site Address (URL) from https:// to https://.
    4. Save the settings.

    Please note that you may be logged out of the WP admin dashboard when these changes are applied.

    Fixing Mixed Content Errors

    2. Use a WordPress Plugin

    Really Simple SSL popular plugin can automatically detect and fix mixed content errors. Usually, after you install and activate the plugin it takes care of all mixed content errors and no further actions are required.  We have a full tutorial on adding and activating the plugin in the WPX Knowledgebase.

    The steps are easy to follow: 

    1. Install and Activate the plugin; 
    2. Select the Activate SSL button in your WP admin dashboard. 
    Fixing Mixed Content Issues

    That’s it, the plugin will detect and fix all HTTP URLs that are found in the database (and files) of your website. 

    Note: If you still encounter mixed content errors after installing and activating the plugin, clear your browser’s cache and check your site again using tools like Why No Padlock? or SSL Labs.

    3.  Alternative to Really Simple SSL (.htaccess) 

    If you’re not a fan of having more plugins or you just want to deep dive into the files of your WordPress site this is the solution for you. You can force HTTPS by adding the following lines to your .htaccess file:


    <IfModule mod_rewrite.c>

    RewriteEngine On

    RewriteCond %{HTTPS} !=on

    RewriteRule ^ https://%{HTTP_HOST}%{REQUEST_URI} [L,R=301]

    </IfModule>

    4. Run Search and Replace 

    If your website still serves some resources via HTTP after following the previous steps, you might need to do some manual work:

    1. Database Search and Replace: Use a plugin like Better Search Replace to find and update all instances of HTTP URLs in your database.
    2. Theme and Plugin Files: Check your theme’s files and plugins for hardcoded HTTP URLs and update them.

    Note: If the hardcoded links are external and don’t have an SSL certificate (on their host), they may stop loading when updated to HTTPS, causing 404 errors on your website. To avoid this, consider replacing those resources with secure alternatives.

    Preventing Future Mixed Content Errors

    1. Always Use HTTPS: Ensure your WordPress Address and Site Address in Settings > General are set to HTTPS. Use HTTPS when adding new content or resources.
    2. Regularly Scan Your Site: Periodically check your site for mixed content using the methods described earlier.
    3. Update and Maintain: Keep your WordPress core, themes, and plugins updated.        Regularly review and clean your database to ensure no old HTTP links are present.

    Conclusion

    Fixing mixed content issues in WordPress is crucial for maintaining a secure, trustworthy, and SEO-friendly website. By following the steps outlined in this guide, you can effectively identify and resolve these issues, ensuring a seamless and secure experience for your visitors.

    For more tips and detailed guides on WordPress maintenance, be sure to follow the WPX blog. Happy blogging!

    Having WordPress Permalink Issues? Check out our guide on how to fit them!

  • Exporting WooCommerce Orders (3 Simple Methods)

    Exporting WooCommerce Orders (3 Simple Methods)

    Dealing with an online business through your WooCommerce website requires a lot of effort. One important step of the whole process is to contain and save your WooCommerce orders regularly, not only to keep track of them but to have a fail safe backup if something is to break or happen in the future.

    That is the main reason why we are writing this article to explain 3 ways to export the orders from your WooCommerce website as easily as possible.

    Step 1. Navigate to your WooCommerce Dashboard Menu.

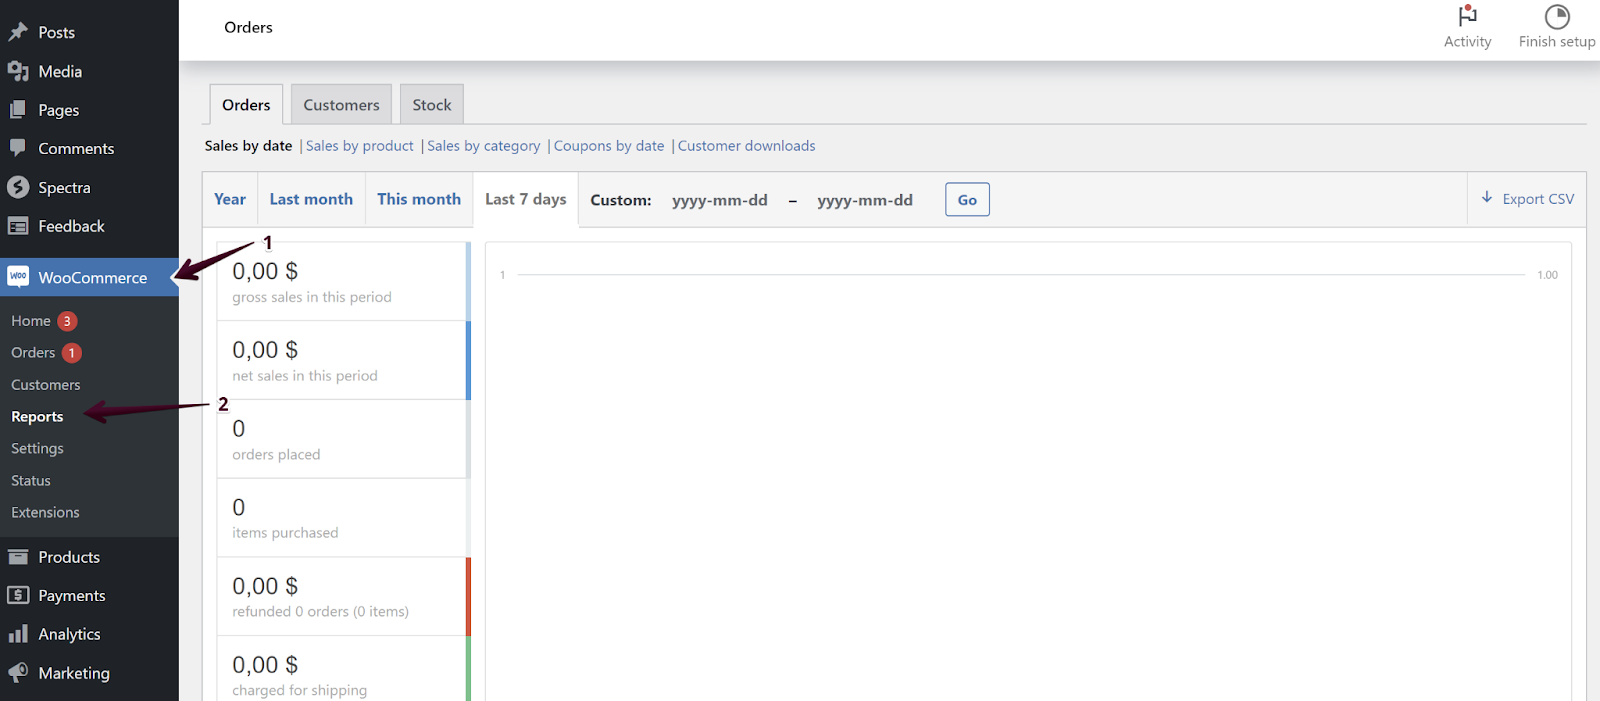
    To begin the process, first you need to log into the dashboard of your WooCommerce website. Afterwards, navigate to the WooCommerce menu (1) and Reports (2) section:

    woocommerce dashboard menu

    From there you can see all the orders with different categories and sections. You can choose the specific time frame to sum up all of the orders made on your WooCommerce website and export them in the desired format.

    Keep in mind that the built-in WooCommerce feature has the option to list and keep statistics for all orders, customers and stock inventory for your online business.

    Orders section contains data divided by:

    • Sales by date – to the specific timestamp, number of overall sales;
    • Sales by product – to the specific product, number of overall sold products;
    • Sales by category – to the specific category, number of overall sales in it;
    • Sales by coupons – to the specific coupon, number of overall sales made with an added coupon;
    • Sales by customer downloads – to the specific online content, number of overall downloads.

    Customers section contains data divided by:

    • Customers vs Guests – number of overall people who visit the site and order vs people who only generate traffic without purchasing a product.

    Stock section contains data divided by:

    • Low in stock – the number of products you have currently available on your WooCommerce website;
    • Out of stock – the number of products you do not currently have inventory of on your WooCommerce website;
    • Most stocked – the number of products you currently have in quantity and in stock on your WooCommerce website.

    Step 2. Export the information in CSV Format via WooCommerce built-in functionality.

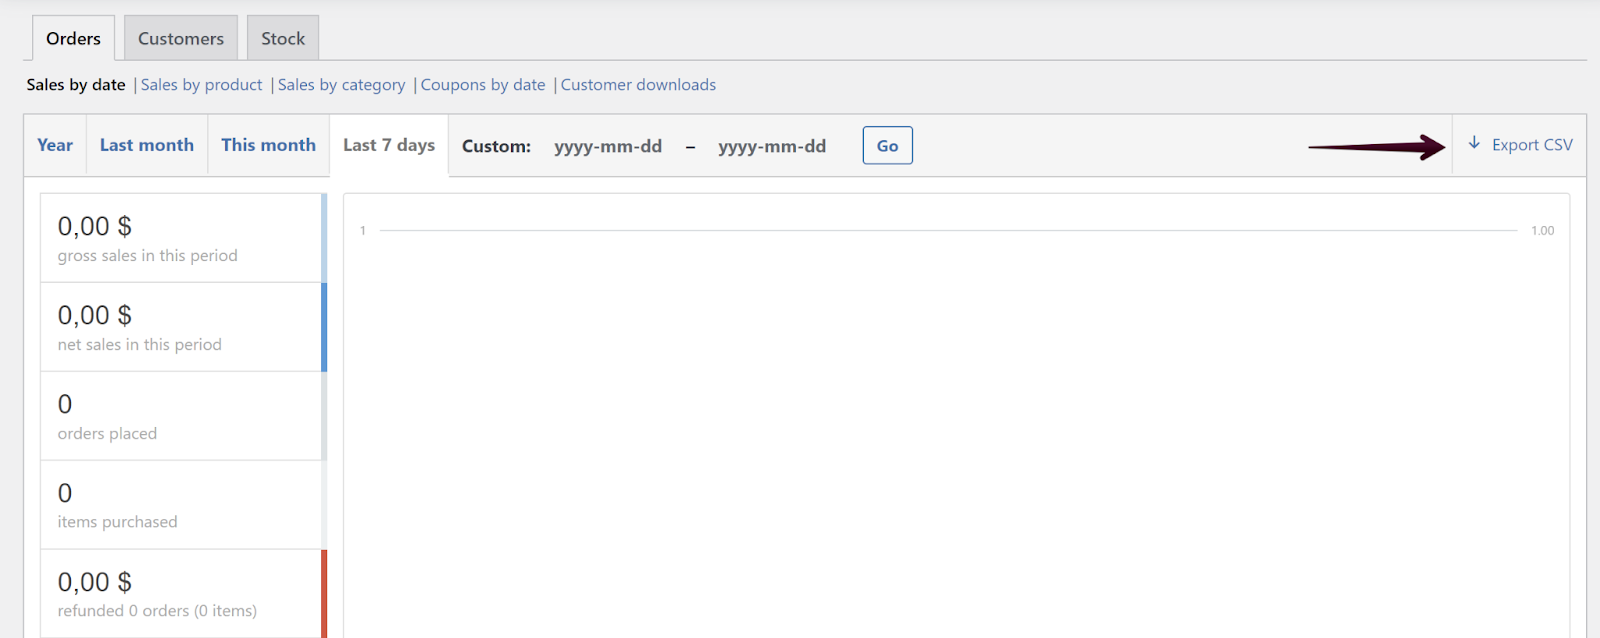
    Once you have listed and gone through all the needed data with the desired parameters, you can continue to download the data through the Reports section by choosing Export CSV button:

    eport the information in csv format

    Keep in mind that you have an option to export the needed information from the WooCommerce plugin for the Orders and Customers section only. The last Stock section is simply for keeping track of the current inventory state of your online WooCommerce website.

    That’s it. Once you select the button, your data will start to download and finish in CSV format. You can later on open it locally on your computer to keep track of the information. The built-in feature sorts out the information beforehand.

    Step 3. Export the information in XML Format via WordPress built-in Tools.

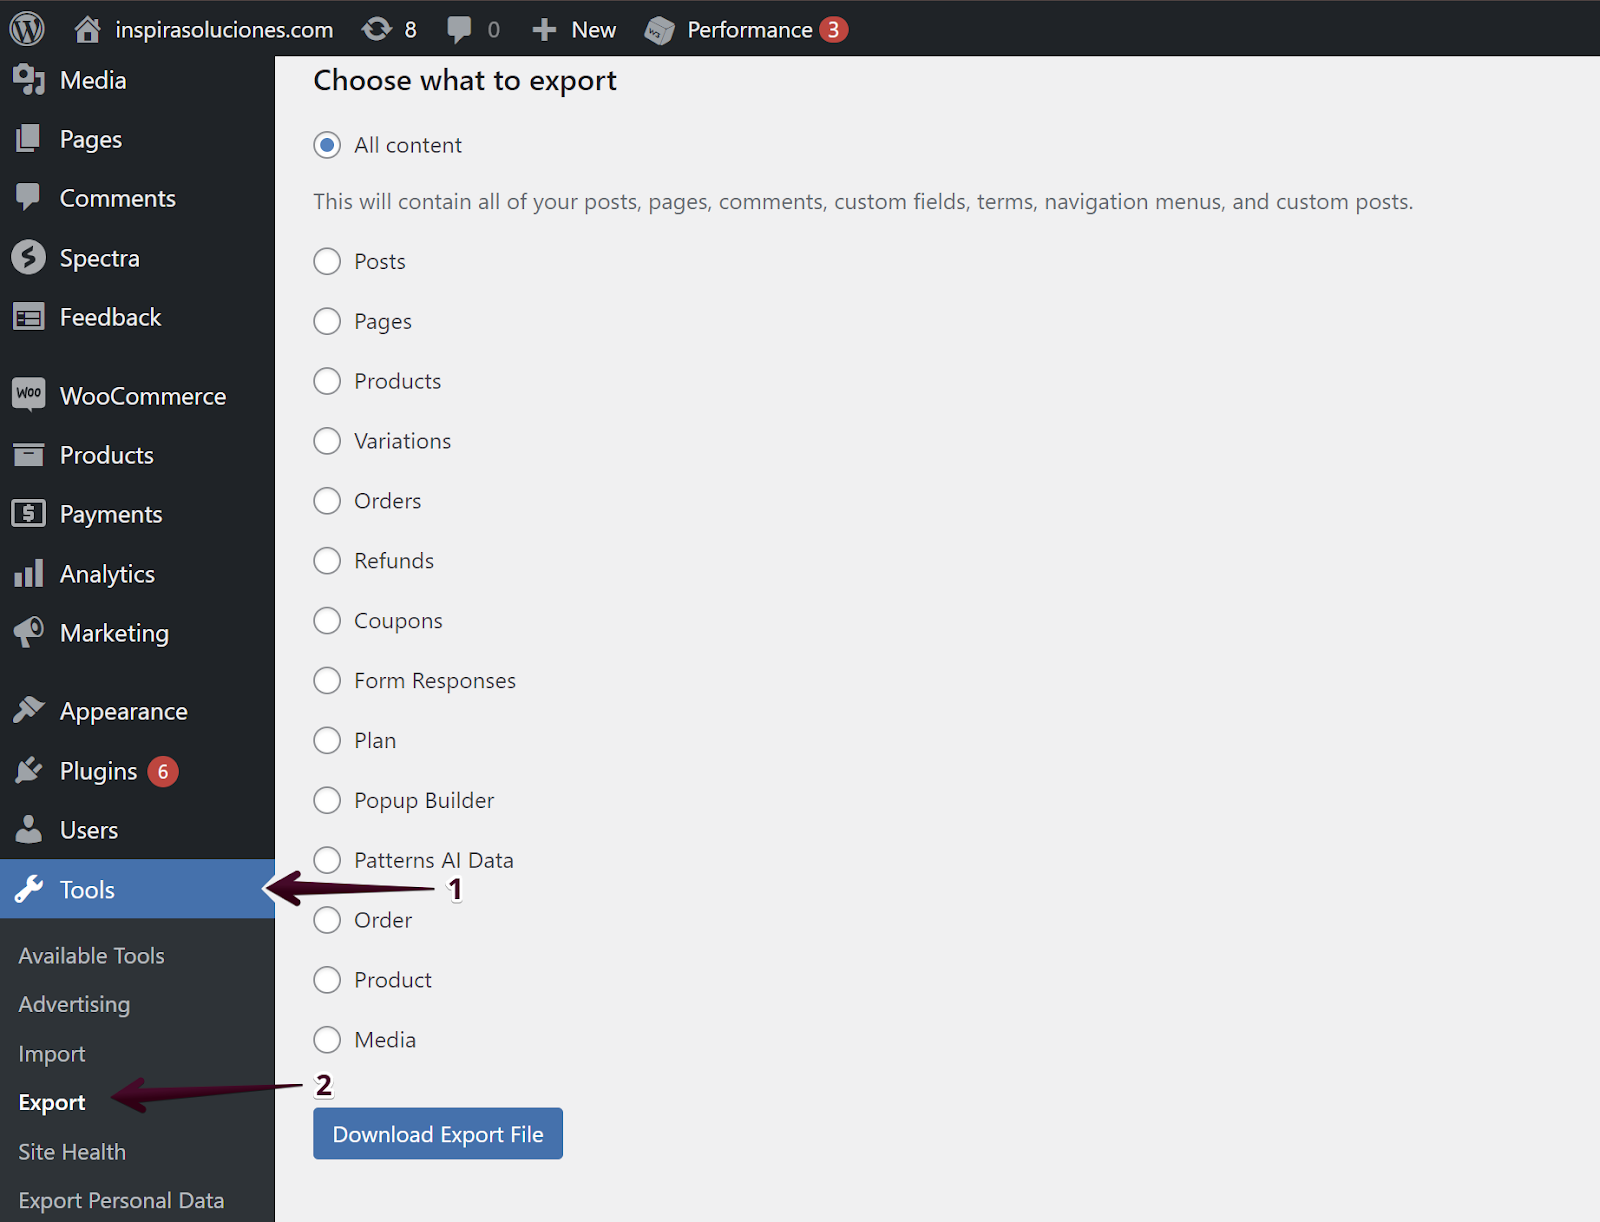
    This method displays the option to use the built-in WordPress Tools to export and download all the orders generated from your online business website.

    To do that, you would need to navigate to Tools (1) category and Export (2) section to complete the process:

    export the information in xml format

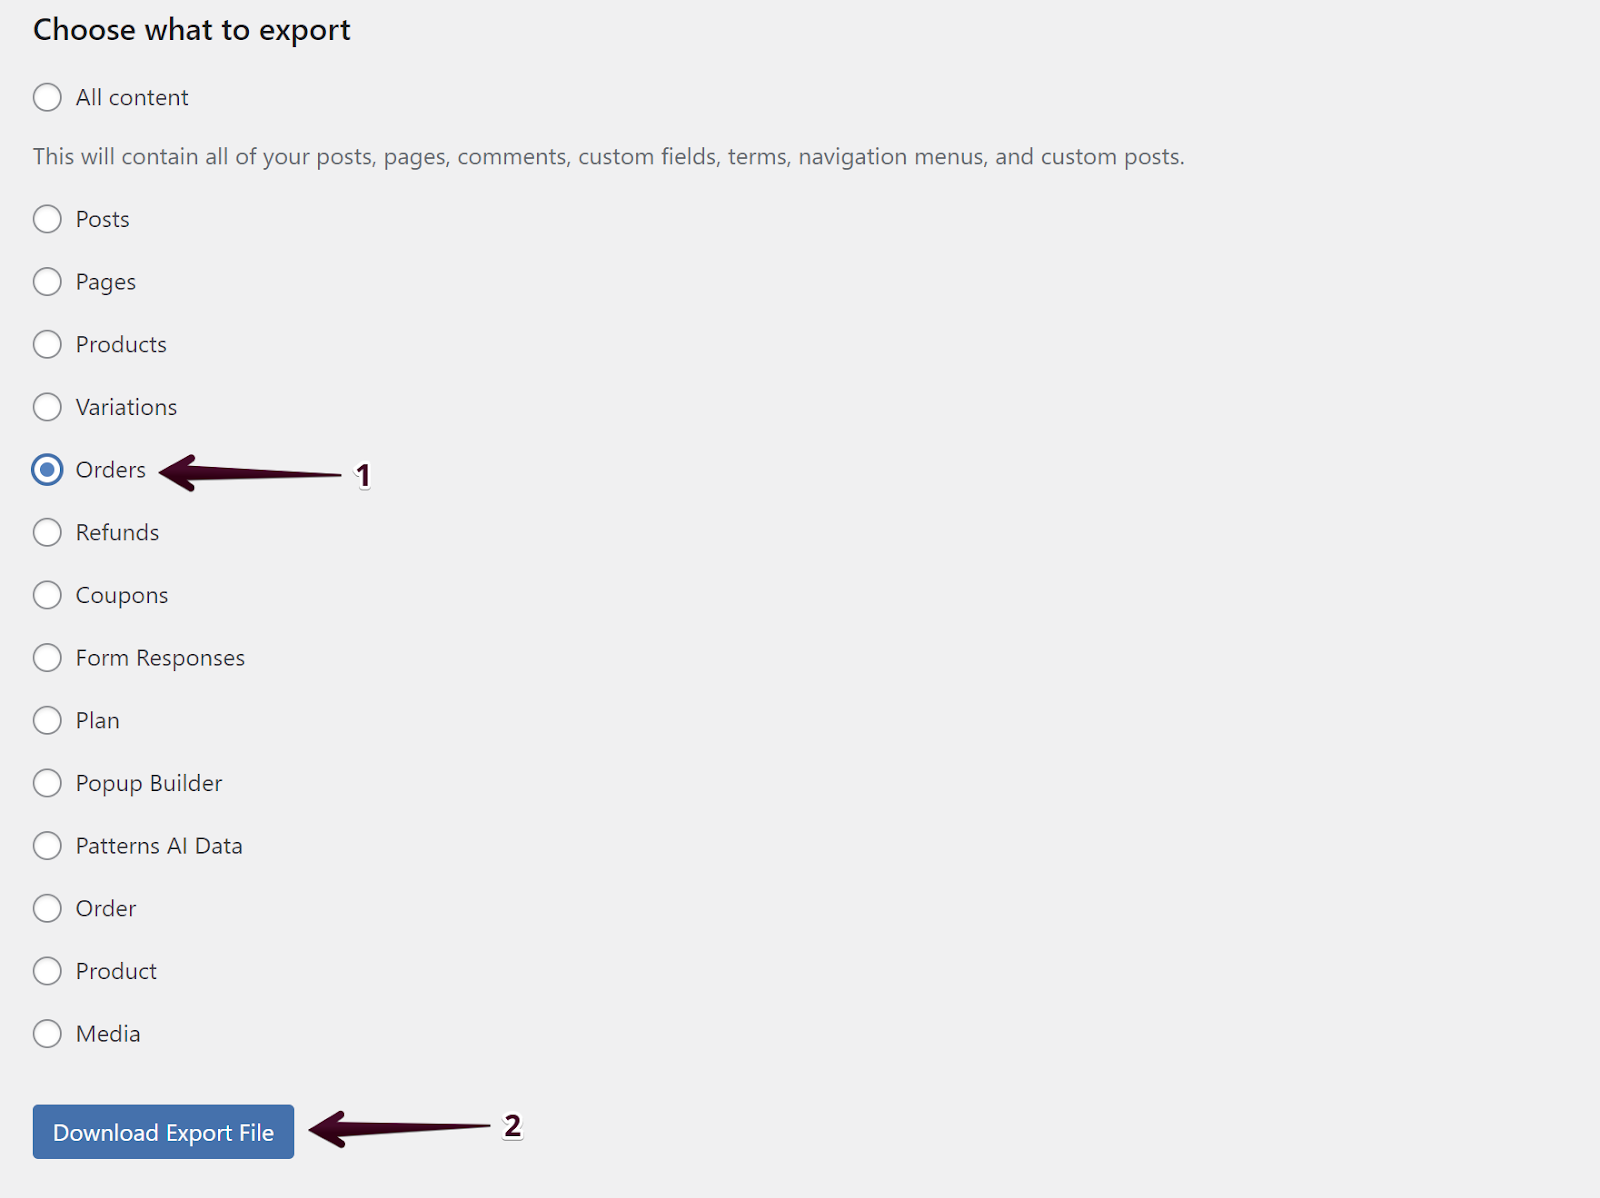
    Once done, you will need to select the specific content you wish to export. In the case of the topic, that would be all Orders (1) and then select Download Export File (2):

    export woocommerce orders

    That’s it. You will see the download start locally on your computer. Keep in mind that the file will be in XML format.

    The WordPress Exporter Tool does not have the same functionalities as the built-in WooCommerce one. There aren’t any parameters which you can set to divide the information such as time frame, products, coupons etc. Thus, the downloaded file will just be a summed up file of all the orders ever created on the website. You will need to separately sort them out.

    There isn’t any specific difference between the CSV and XML format. If you are wondering which to choose, the decision would weigh more, depending on the functionalities that are offered during export. In terms of better management of data, using the built-in WooCommerce option would be best since it auto-sorts the data and allows you to use different parameters. The XML format through WordPress Tools just provides simple export functions on almost all the content on your website but without parameters or sort options. Both formats are easily exported and can be imported at any time to any other WooCommerce websites built on WordPress CMS platform.

    Step 4. Export your data via WooCommerce plugin.

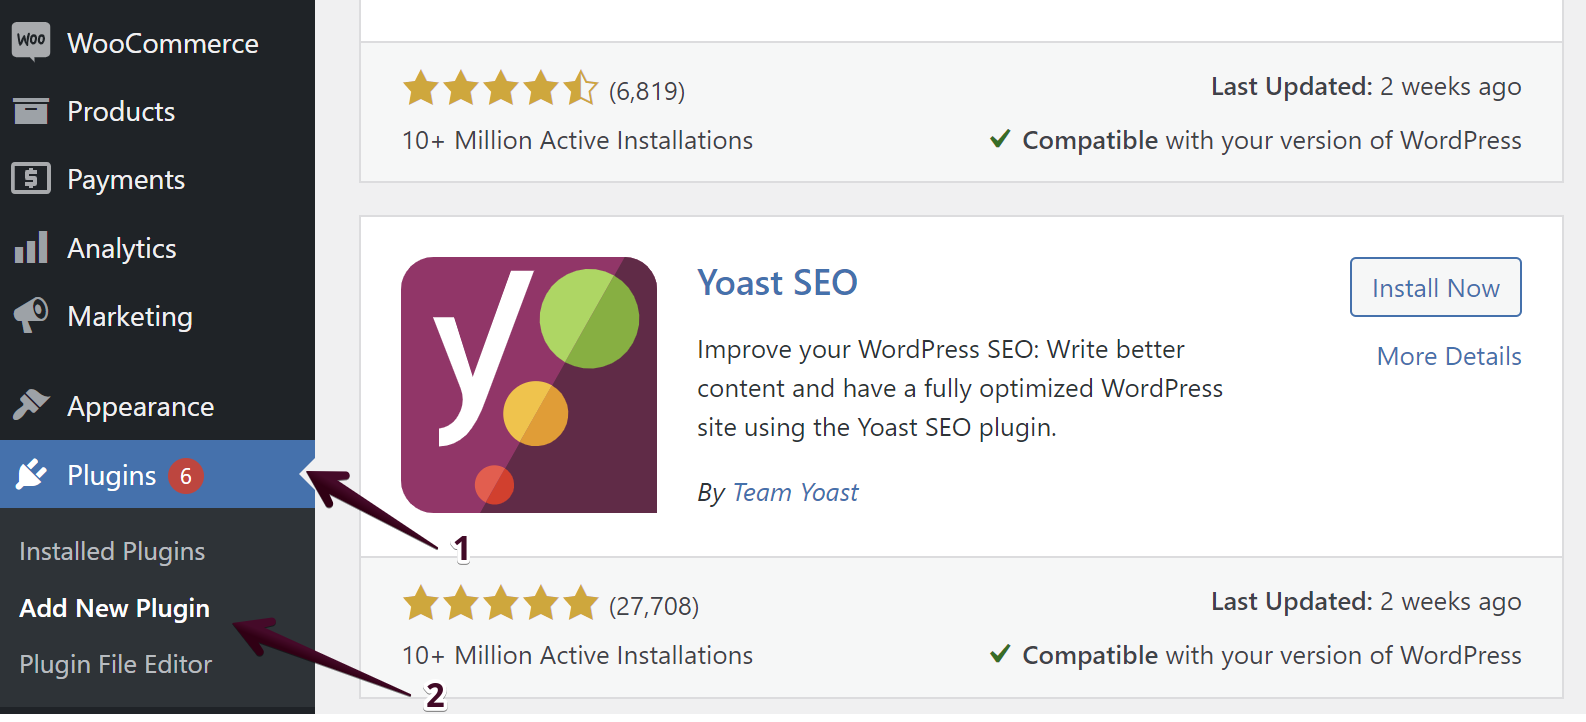
    The last and third option would be to use a WooCommerce plugin. To do that, you would need to search and download it through the Plugins (1) section and navigate to Add New Plugins (2):

    export orders via woocommerce plugin

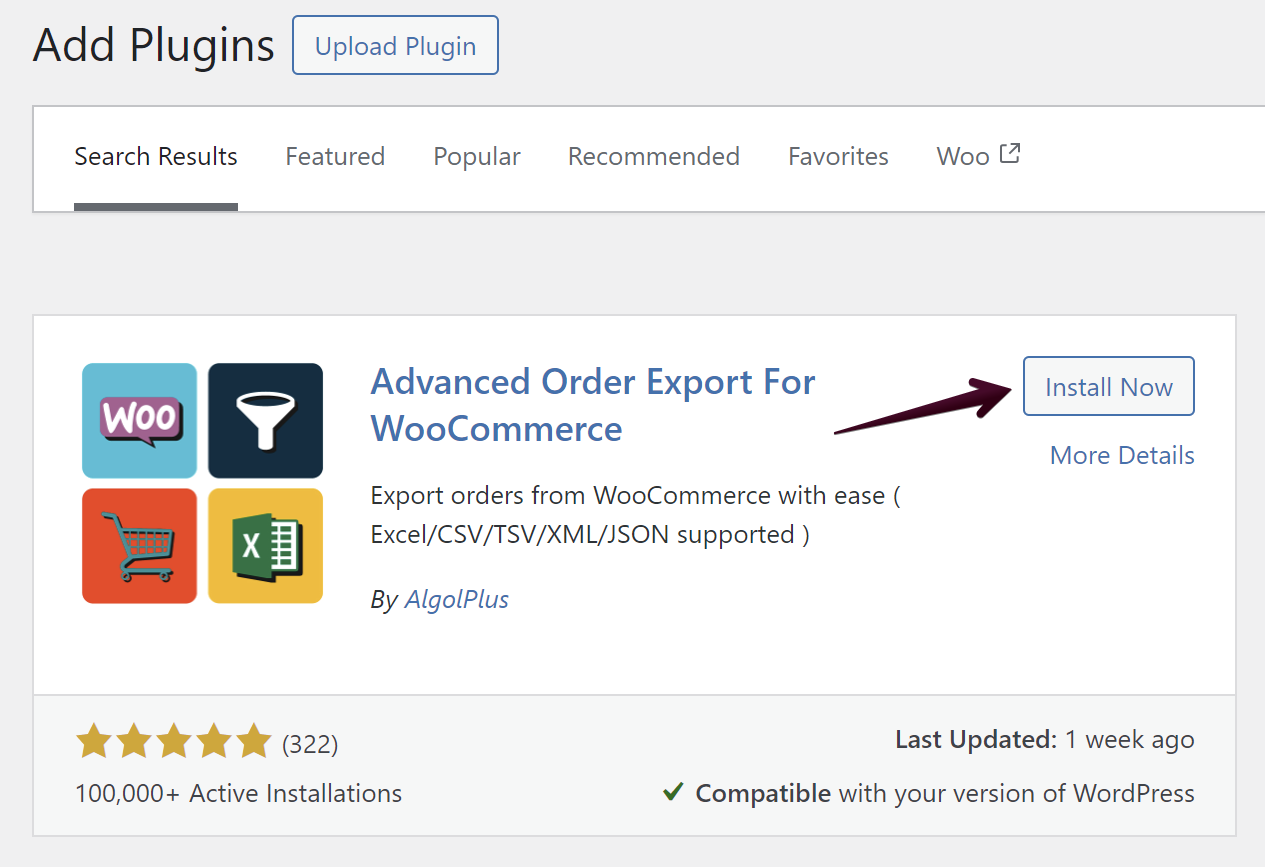
    From there you would need to use the Search Bar and input the name of the plugin: Advanced Order Export For WooCommerce. Once you list the plugin, you can choose Install Now option to complete the process:

    advanced order export for woocommerce

    Once installed and activated, the plugin will basically replace the previous built-in WooCommerce option for exporting data via CSV format from Step 2 of the article.

    The plugin in general provides more in-depth options and parameters to further advance your statistics and gathering of data from your WooCommerce online business.

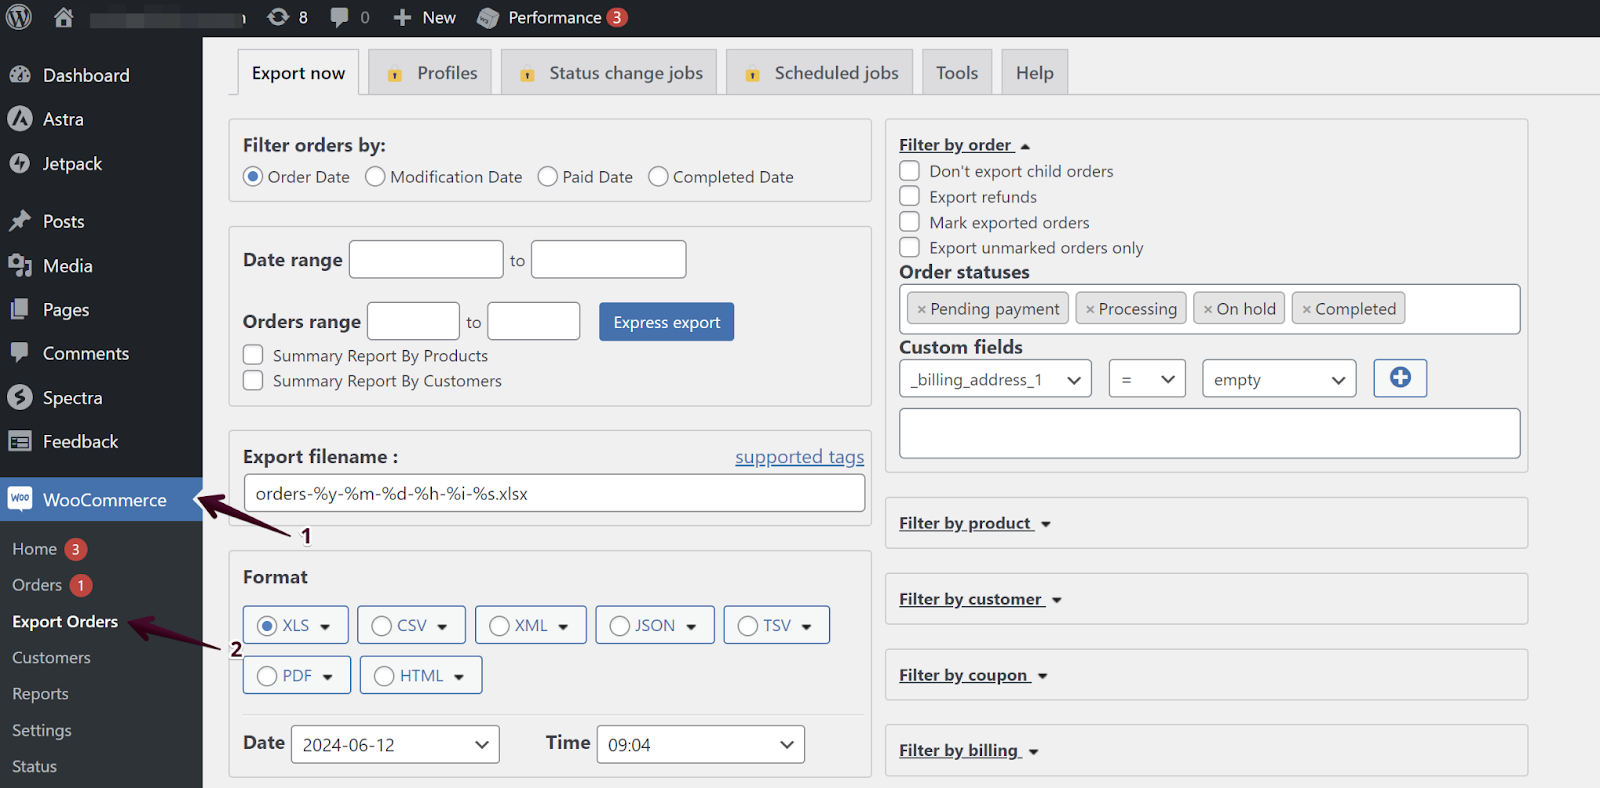
    The steps to accessing the plugin functionalities are similar to the first method. You would need to navigate to WooCommerce dashboard (1) and select Export Orders (2):

    export orders

    You can see that there are much more options to divide the data, however and whichever you want to. Additionally you have the option to name the file that you export, which again, adds more structure to sort out everything on your end. Multiple formats can be chosen to download the data in and so forth.

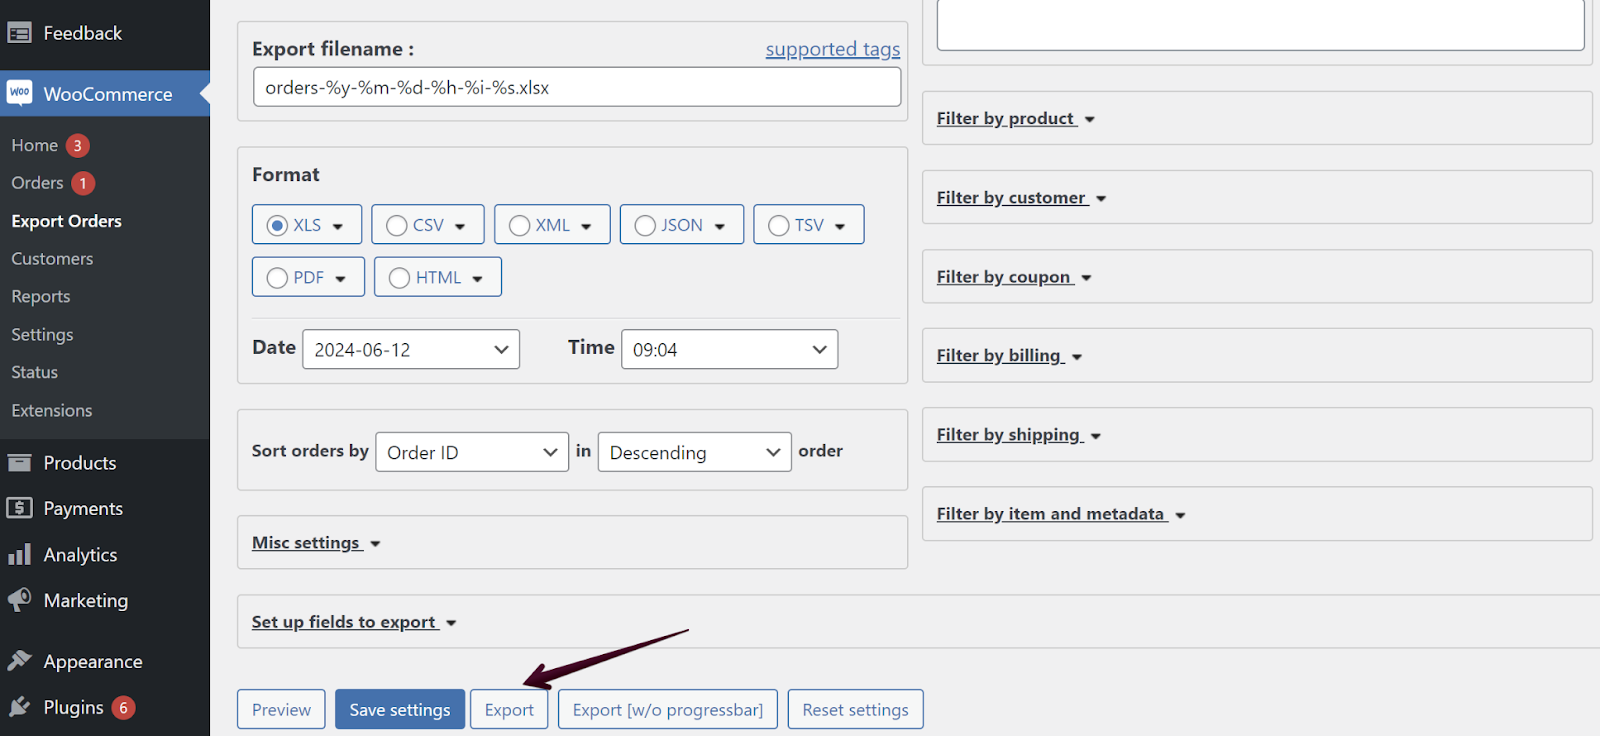
    Once you have completed everything and completed the process, you can name the file and select Export option to finish it:

    export woocommerce orders

    That’s it. We went through all three methods which you can use to export data from your online sales, orders, products and much more.

    Keeping track of your online orders, products and inventory is a crucial part of  the success factor for any WooCommerce store. As you grow your business, orders begin to pile up, naturally categories get added, different products and thus, the need to export all the information to analyze it and get better, becomes that much necessary.

  • A Beginner’s Guide to Adding Custom Fonts to WordPress in 2 Easy Steps

    A Beginner’s Guide to Adding Custom Fonts to WordPress in 2 Easy Steps

    As any other online business, you want your website to stand out from the rest by using different themes and plugins to appeal to your visitors. One strong recommendation when managing a WordPress based website is to use different custom fonts to add to your design that much needed final touch. We will cover the basics in this article on which fonts to use and how to choose them carefully to fit your individual needs.

    Step 1. Find and choose the correct Custom Font for your WordPress Site.

    Finding sources for the perfect custom font to add to your WordPress website will not be hard since there are a lot to cover such as Google Fonts, FontSquirrel, and FontSpace.

    Heroic Message: Additionally, if you are picky with your choice and do not like the fonts that are offered from the services mentioned above, you can try and generate your own unique custom font, driven by your ideas. That can happen by using a tool such as FontSquirrel Generator. From there you can choose from a variety of different options to pick the correct one to your liking. 

    The main thing to look for in a font would be the “be cool” factor and how it will stand out on your website and of course, the boring stuff related to readability, where you need to be careful.

    Keep in mind that the “cool” factor for choosing a unique font needs to be thought through carefully since it will affect the readability of your website. If it looks cool but damages the overall look of the website, we recommend that you source out a different one that will suit your needs in a balanced manner. You need to make sure that your visitors can read easily through your website without having too many different fonts and actions happening in one place, leading to annoyance.

    Step 2. Adding Custom Fonts from Google Fonts.

    As explained earlier, Google Fonts provides the biggest library available for free for fonts to use on your WordPress website. If you are searching for the perfect one, that will most likely be the best place to find it.

    The first step to adding the desired font is to install the plugin Google Fonts Typography on your WordPress website. Once installed, you will need to activate it like any other WordPress plugin you have.

    Upon activation, you will be prompted to input an email address to receive a beginners guide on how to properly use the plugin. The step is optional and it is up to you if you want to use their free instructions on how to utilize it:

    Adding Custom Fonts from Google Fonts

    The next step is finally where some work is done on your website. You would need to navigate through the dropdown menu of the plugin and choose Customize Fonts:

    customize fonts

    From there, you will be automatically redirected to the built-in WordPress Theme Customizer:

    wordpress theme customizer

    There, you can start laying the foundation for your WordPress website by choosing the default fonts through the “Basic Settings” section:

    fonts plugin

    There, you will see all the different fields you can choose to set up the groundwork for your website appearance such as your base, heading, buttons and inputs.

    Once you have chosen all the options for different fonts on the left of your screen, the right half will generate a preview of all the things you saved, so you can actually see what you are doing in real time.

    Once you are done with the basics, you can start applying custom fonts for different parts of your website through the “Advanced Settings” section:

    advanced settings

    From these settings you can basically touch up and fine tune all the groundwork you set with the basic fonts and make changes on your Site Title, Navigation Menu, Content and much more.

    Every section in “Advanced Settings” has a drop-down menu from which you can choose different fonts. Wants you are ready with all the major changes on your WordPress website appearance, then you can simply save all the changes by clicking Publish:

    customizing fonts

    That’s it! You have successfully learned how easy it is adding custom fonts to WordPress site! An important note to take here is that you need to check if all the fonts mix and match together, as well as the read quality of your website. Fun recommendation is to get some of your friends to read through your website and make suggestions if something is wrong with the text. Most times those little things might matter and help you sort out anything that you haven’t noticed already.

    If you find this guide on adding custom fonts to WordPress helpful, check out our Beginner’s Guide to Backing Up WooCommerce Orders too!

  • How to Backup Your WordPress Site (3 Simple Methods)

    How to Backup Your WordPress Site (3 Simple Methods)

    We all know how much time and effort goes into creating and maintaining a WordPress site. It’s like your place on the internet where you share your passions, business, or ideas with the world. But have you ever thought about what would happen if all your hard work disappeared instantly? Scary, right? That’s why backing up your WordPress is essential to protect your content, settings, and configurations from data loss due to hacking, server issues, or accidental deletions.

    In this guide, I’m going to walk you through three simple and effective methods to back up your WordPress site. Whether you’re a tech newbie or a seasoned pro, you’ll find a method that fits your comfort level. Let’s dive in!

    Method 1: Backup your WordPress site using a Backup Plugin 

    Using WordPress plugins is the easiest and most popular way to make a backup of your site. There are plenty of options available in the WordPress library making it easy to find a solution that fits your needs. Among the most commonly used backup plugins are  All in One WP Migration, Duplicator, and UpdraftPlus. We’ve covered them in detail in our knowledgebase article. 

    It’s important to note that backups created by backup plugins are initially stored on your server and count towards your overall disk space usage. To save space and enhance security, you should download these backups to your local computer or another remote storage solution. This approach ensures your backups are safely stored separately from your hosting service, providing an additional layer of protection to your content.

    Method 2: Backup your WordPress site from your hosting control panel

    Many WordPress hosting providers, including WPX, offer backup services. At WPX, we automatically make daily backups of all websites hosted with us, keeping them for 28 days on separate servers. Additionally, you can create personal backups at any time of all your sites and download them to store safely on your local device. This option is conveniently available in the WPX Control Panel.

    If you’re using cPanel, you can back up your website by compressing the files in your File Manager and exporting the database of your site using phpMyAdmin. Depending on your hosting provider, there may be even easier options available to back up and download your site’s content.

    Method 3: Backup your WordPress site using FTP and phpMyAdmin

    This method is more technical but offers a thorough backup solution. Here’s how you can manually back up your files and database through the WPX Control Panel:

    Backup your files using FTP

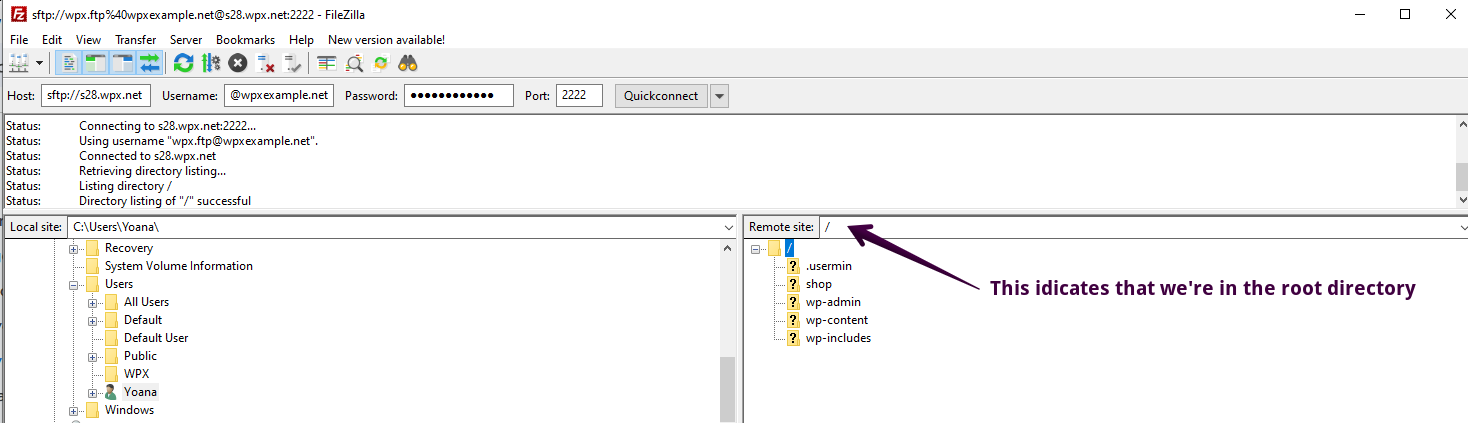
    To backup your files using FTP access you’ll need an FTP client like FileZilla. A detailed tutorial on how to connect with FileZilla can be found in the WPX knowledgebase. The basic steps are similar across most hosting services:

    1. Download and install an FTP client like FileZilla.
    2. Connect to your web server using your FTP credentials; If you’re using an sftp connection, don’t forget to add sftp:// before the hostname the your server.
    3. Once you’re connected, navigate to the directory where your WordPress site is installed (usually that is a directory named public_html);
    4. It is not possible to compress files using FileZilla so you can download all files by selecting them (for Windows CTRL+A for Mac Command-A). 
    5. Then click the right button on the mouse and select the Download button to download the files to your local device.

    By following these steps, you will have a complete backup of your WordPress site files.

    Backup Your Database via phpMyAdmin

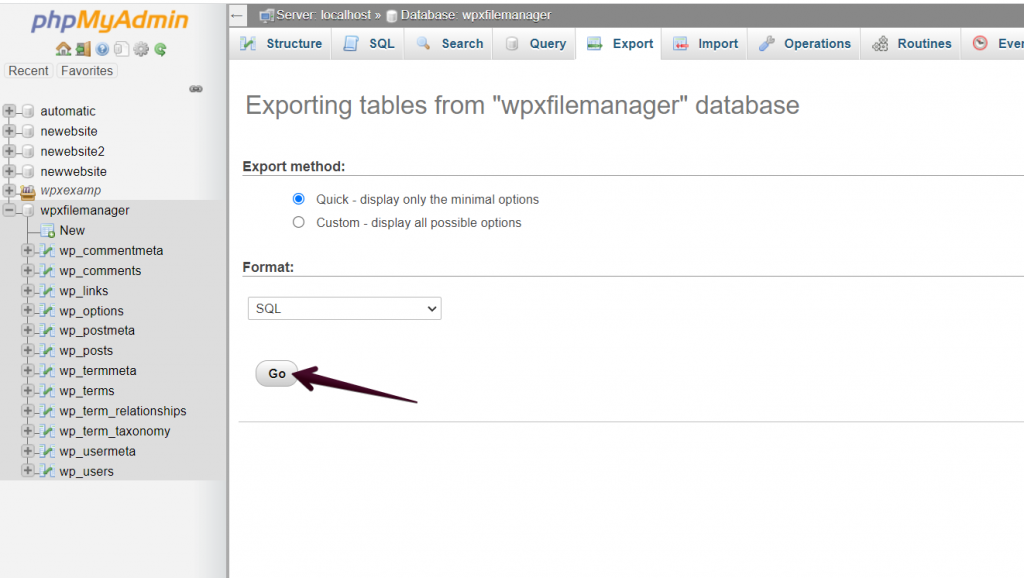
     To export the database of your site, you need to access phpMYAdmin from your hosting’s control panel. Here is a detailed tutorial on exporting a database from the WPX control panel. Regardless of your hosting service, the basic steps are as follows:

    1. Log into your hosting account’s phpMyAdmin 
    2. Select your WordPress database.
    3. Click on the Export tab.
    4. Choose the Quick export method and SQL format.  Then click on the Go button to download the exported database. 
    Backup Your Database via phpMyAdmin

    Tips for Effective Backups

    • Schedule Regular Backups: Depending on how frequently you update your site, schedule daily, weekly, or monthly backups.
    • Store Backups Offsite: Always store your backups in a remote location like cloud storage or an external hard drive to avoid data loss in case of server failure.
    • Test Your Backups: Periodically test your backups to ensure they can be restored successfully.

    Conclusion

    Backing up your WordPress site is crucial for maintaining its integrity and ensuring quick recovery in case of any issues. Whether you choose a plugin, cPanel, or FTP and phpMyAdmin, each method provides a reliable way to secure your data. Regular backups, offsite storage, and periodic testing will keep your website safe and give you peace of mind.

  • Properly Deleting Categories in WordPress – Step-by-Step Guide

    Properly Deleting Categories in WordPress – Step-by-Step Guide

    What is a Category in WordPress?

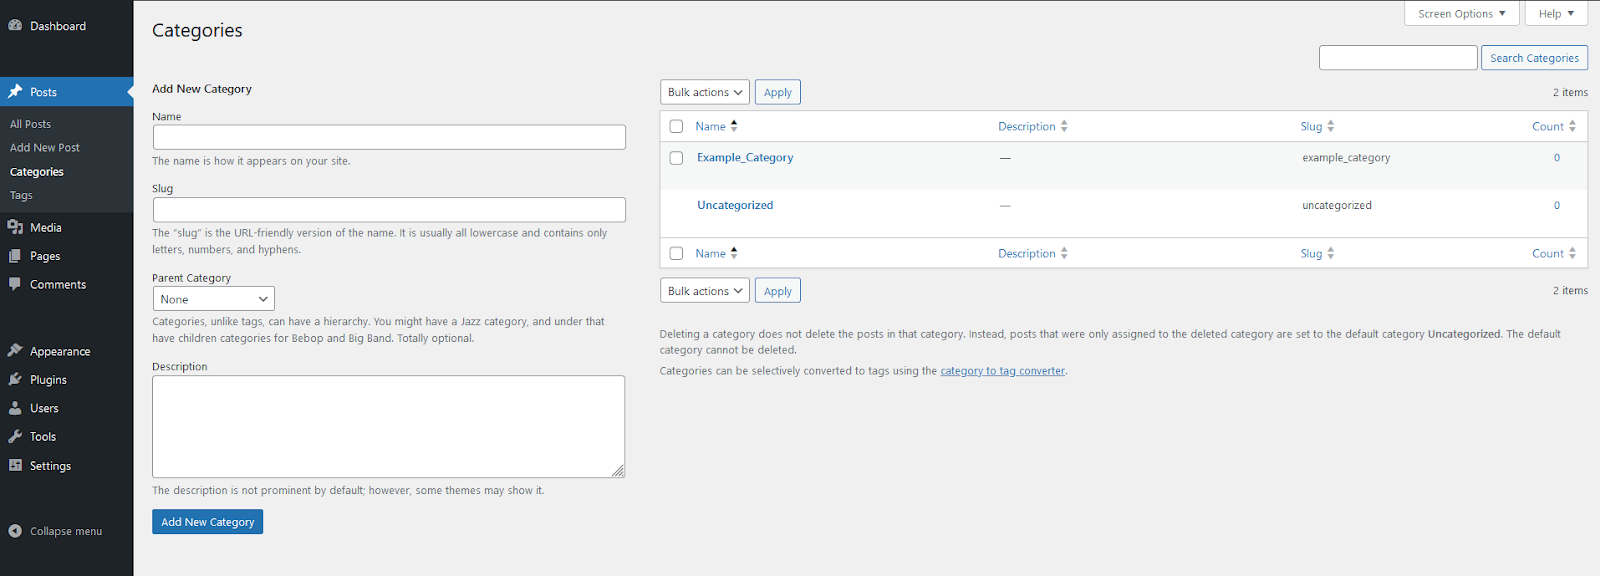
    In WordPress, a category is a classification used to group and organize related posts. Categories help improve site navigation by making it easier for users to find content. They also assist in structuring the site’s content hierarchy, allowing for broader to narrower classifications. For example, a food blog might have categories like “Recipes,” “Restaurant Reviews,” and “Cooking Tips.”

    Categories can be hierarchical, meaning you can have parent categories and subcategories. For instance, under the “Recipes” category, you might have subcategories like “Vegetarian,” “Desserts,” and “Quick Meals.”

    category in wordpress

    How Does a Category Work?

    1. Creating Categories: Categories can be created via the WordPress dashboard. Go to Posts > Categories, then fill in the name, slug (URL-friendly version of the name), and optional description. You can also assign a parent category if you are creating a subcategory.
    2. Assigning Categories to Posts: Whe