In this post I will show you how to disable WP Cron and explain why you should do that.
Since its inception, WordPress is being developed to be simple to install and configure and to allow running on a large range of platforms where end-user have different levels of control.
This certainly contributes to the popularity of WordPress, but over the years some of the architectural decisions have proven to be less than optimal.
The way WordPress runs periodic housekeeping tasks is an example of this issue. The solution works, but it can decrease the performance of infrequently visited and heavily trafficked websites alike.
But what are these periodic tasks and why are they needed? Let me explain.
First things first — what is a cron job?
All modern operating systems have some kind of scheduler that allows automated execution of tasks at regular, predetermined intervals. This functionality has existed since the 1970s and these periodic tasks are called cron jobs.
Funny enough, the name itself is a spelling error; Brian Kernighan — one of the fathers of the UNIX operating system and the C programming language — who implemented the idea, wanted a term that infers a relationship with time, and chose the Greek word for time (chronos) but, as he admitted later, “I never could spell”.
Why WordPress needs to execute periodic tasks
Like essentially all other modern software, WordPress needs to execute certain housekeeping tasks from time to time to do its job and stay healthy. Examples of such tasks are:
- scheduled checks for updates to the WordPress core, themes, plugins, and translations;
- the sending of transactional emails (for example, to notify the administrator if a comment under a blog post has been flagged for moderation);
- updates to database tables, renewal of expired cached pages, etc.
WordPress is designed to be as independent of its server environment as possible. Especially in the beginning (WordPress came out in 2003 — nearly 2 decades ago!) there weren’t very many technically capable users. Many web hosting services did not offer their users the ability to schedule cron jobs for fear they would break things.
That is why the WordPress developers had to come up with a way to go around that limitation. Their solution was to make WordPress trigger an internal task scheduler on every customer visit. This task scheduler would look at the current time, check if one or more cron jobs were due for execution, and start the cron process if needed.
Unwanted delays
There are two problems with this solution. The first one is when the website receives too little traffic; it means that whenever a visitor comes after several hours of inactivity, there might be a long queue of tasks that are due for execution. And even though the website usually loads fast, that unlucky user will get a degraded experience while the tasks are executed.
The second problem is when the website receives more traffic. The scheduler starts a check every time a new visitor comes, which could mean these checks pile up unnecessarily.
Luckily, there is a fix for that situation, and I highly recommend that you take advantage of it.
Replacing WP Cron with a real cron job
This requires two steps:
- Configure WordPress to stop using WP Cron
- Configure an external task that runs on a specific schedule
How to deactivate WP Cron
To do this, you need to open the wp-config.php file in the root folder of your website, and scroll down until you find the following lines near the end of the file:
define( 'WP_DEBUG', false );
/* Add any custom values between this line and the "stop editing" line. */

/* That's all, stop editing! Happy publishing. */
Note: the contents of your wp-config.php might differ and there could be other lines there. This should not worry you; the sequence of defined directives is not important.
Add this declaration between the two comment lines: define('DISABLE_WP_CRON', true);
The file should look like this:
define( 'WP_DEBUG', false );
/* Add any custom values between this line and the "stop editing" line. */
define('DISABLE_WP_CRON', true);
/* That's all, stop editing! Happy publishing. */
Save the file and close it; this is enough. However, remember this change has an immediate effect, and as soon as you disable WP Cron, your website will lose the ability to manage itself. That is why you should complete the next step soon after this one.
How to create a real cron job
For WPX customers
If you are a customer of WPX, this one is a real piece of cake. You simply need to send a ticket to the friendly WPX support team from https://wpx.net/tickets/new/ and ask them to set up a regular cron job for your WordPress site.
The WP-Cron task is activated by loading the following URL (where example.com should be replaced with your domain name):https://example.com/wp-cron.php?doing_wp_cron
But of course, WPX support knows that. All you need to ask them is to set up a cron job to replace WP Cron, or even simply refer them to this article.
Wait for WPX support to confirm that they are finished, then watch how your website behaves in the next 1-2 days or so; whether it still checks for updates regularly and so on. If something appears wrong, let support know.
For other shared/managed hosting services
If you are not a WPX customer, you could ask the support team the same; the only difference is that they will most likely not respond so quickly. That is why you should postpone adding the DISABLE_WP_CRON line to the wp-config.php file until you hear back from them (or even just ask them to add the line themselves after they are done with the cron job itself).
Via the hosting control panel
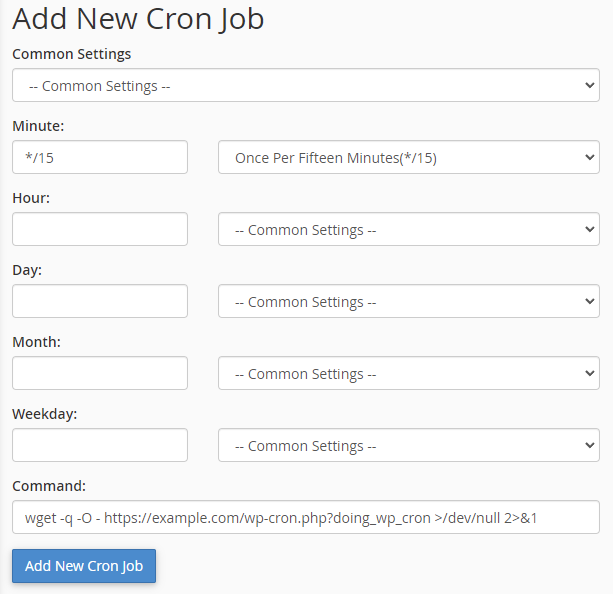
The control panel provided by your hosting (e.g. Cpanel, DirectAdmin) might offer access to the cron job list and allow you to add a new cron job. Have a look around and if you find it, configure it to execute the following command:
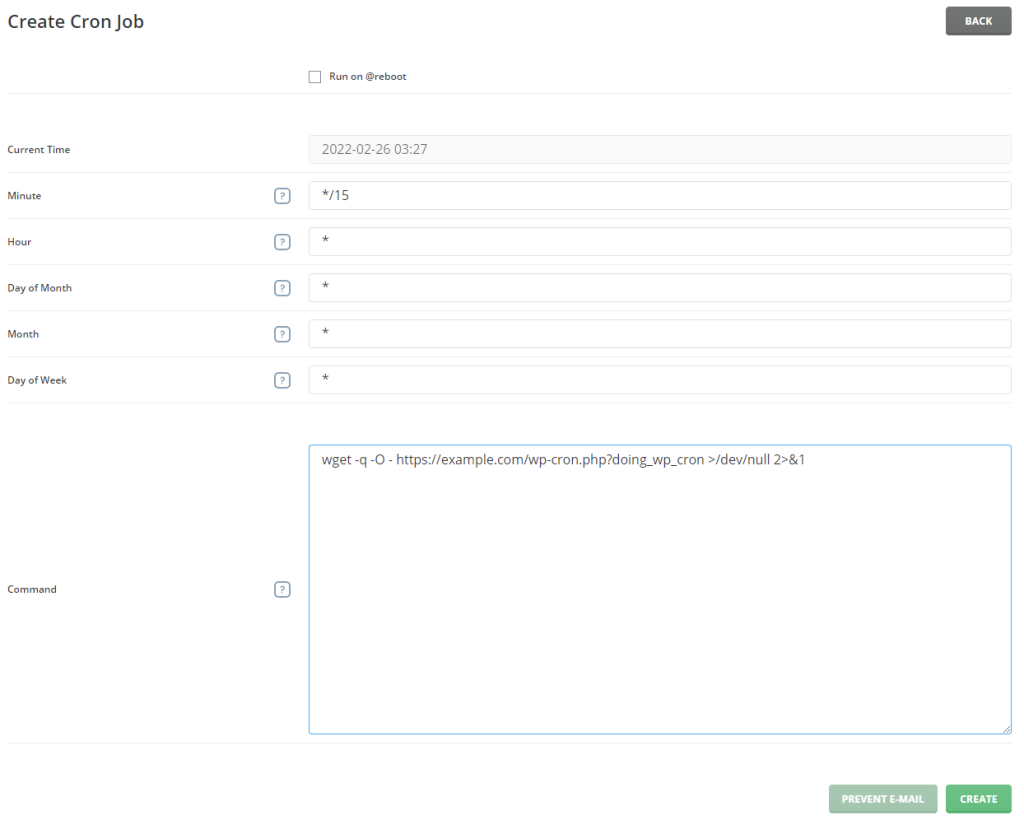
wget -q -O - https://example.com/wp-cron.php?doing_wp_cron >/dev/null 2>&1This is the Cpanel ‘Add New Cron Job’ screen:
And here is what the DirectAdmin ‘Create Cron Job’ screen looks like:
Via PHP script
In the rare and weird situation, your web host doesn’t want to cooperate with the adding of a cron job, you could try adding one via PHP.
To do that, create a file called cron.php in your web root folder and put the following code inside (again, I strongly remind you to replace ‘example.com’ with your real domain, including the www part if you are using it to open your website):
<!--?php
<?php
// Add cron job while avoiding duplication shell_exec("(crontab -l ; echo '*/15 * * * * wget -q -O - https://example.com/wp-cron.php?doing_wp_cron >/dev/null 2>&1') | sort | uniq | crontab") ;

// Output cron jobs list
$output = shell_exec('crontab -l') ; echo "$output" ; ?>
There is a possibility that the web host which does not allow setting user cron jobs will also prohibit execution of shell commands via PHP but you have to try it to know for sure. And if it doesn’t work, you should really think about changing hosts. Seriously.
Note: the php script was adapted from this tutorial by Matt Nikonorov about managing cron jobs via the command line. The elegant thing about his solution is how the existing cron job list and the newly added cron job get piped through several commands: (1) sort arranges them in alphabetic order and (2) uniq removes the repeating lines. The output then gets piped back to crontab. Using sort+uniq guarantees that no matter how many times you execute that script, you will not get duplicate cron jobs.
Via 3rd party Web GUI
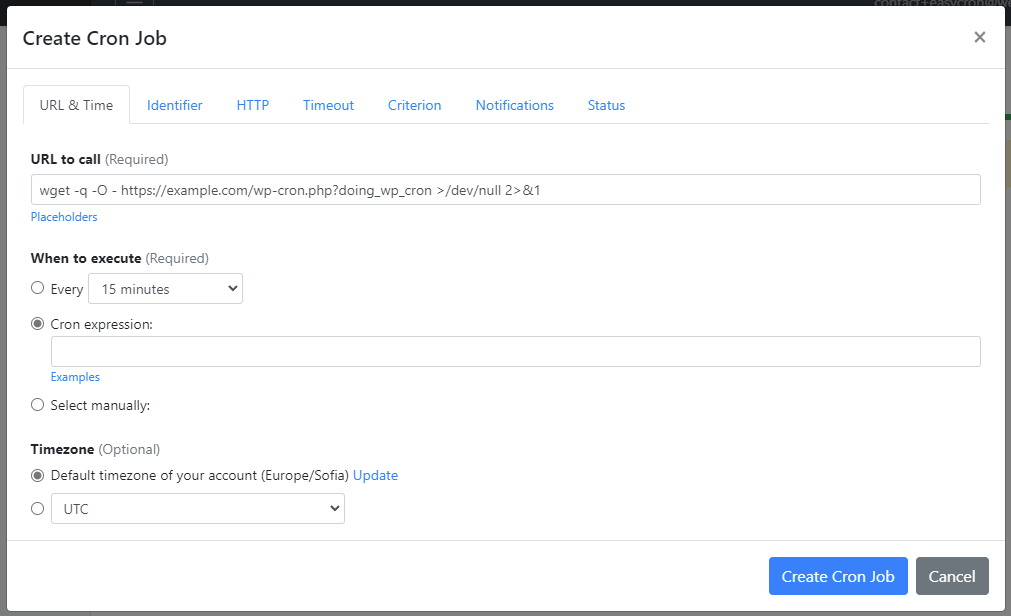
If you do not have access to the cron job and don’t want to wait for a sluggish response from the support of your web host, there is another option: a third-party service called EasyCron which has a free tier and very inexpensive paid tiers starting from $1/mo.
Note: the only drawback of the EasyCron free tier is that your account will expire in 30 days and you need to recreate it. So this solution is best used in combination with the previous one when you contact support. Even if they respond in 24-72 hours, your site will be covered by the EasyCron job during that time.
Recap
If everything has gone to plan, then congratulations! You have decoupled the execution of housekeeping tasks from customer visits.
No longer will the rare visitor of your new and not popular (just yet!) blog wait for several seconds while WordPress tends the execution of a whole pile of overdue tasks.
And if you have made it past that first stage and your website now serves multiple visitors per minute, you will have removed the unnecessary additional burden from the web server which until now had to perform slow repetitive, and unnecessary PHP jobs that increase CPU load.
You also witnessed some examples of ‘under the hood’ operations in which we interacted directly with the OS that runs on your web hosting server. If you find such tricks interesting and don’t find this overly technical, please let me know in the comments below.