Out of the box, every WordPress installation relies upon the email delivering facilities of the server on which it is hosted. And while good web hosting companies (WPX included!) have done a lot to configure properly their mailers, many spam filters will see that emails from one domain name arrive via an IP address that resolves to another domain name, and this will be enough to flag those messages as spam.
Thankfully, there is a low-effort/high-upside action that a WordPress site admin can take to significantly improve the deliverability of emails sent via that website. Instead of relying on the mail relaying capabilities of the underlying server, we can configure WordPress to send emails from the domain itself — just as if the website is another company employee with their own corporate email address.
I will show you how to set up SMTP email delivery for your WPX-hosted WordPress website, and how to test deliverability.
Let’s get going!
Obtain Email Credentials
Using the WPX control panel, obtaining email credentials is very easy (with other hosts, your mileage may vary). From the client area, I select the domain on which I am working at the moment and click on ‘E-Mail Boxes’ in the menu on the left. I then press the “Add an e-mail box” button and get to this screen:

Here is how I fill the different fields (and which ones don’t matter):
E-mail: This is the part before the @ sign. I usually put ‘wordpress’ so that I know the sender is my WordPress site. The drop-down after this must contain the name of the current domain. So in the example website, I am using for writing this tutorial, I will create a wordpress@optimizerable.com address.
Real name: What I write here doesn’t really matter (it would matter only if I create a mailbox for an actual person, which isn’t what I am doing right now). So I usually write down WP System here to remind me it belongs to the blog itself.
Aliases: Leave this one blank.
Set catch-all feature checkbox: Leave this one disabled.
Quota: I usually set the quota here really low. 5MB is more than enough. Remember, this mailbox will not receive emails; however, some emails might bounce back to it for different reasons. 5MB is a lot of space for the kind of text emails that will bounce.
Forward e-mail to: Again, I leave this one disabled.
Password/Confirm password: I generate a good, long password (12-18 characters, numbers, and symbols) and write it down somewhere. Conveniently, there is a Generate button which will do that for me and another button next to it that copies the password to my clipboard.
Send settings to: Here I put another email address that I can check immediately. Very soon, I will need the settings sent there for the next step of the process where I configure WordPress to use SMTP. Remember: you need to keep the password you generated; the settings email will not contain it.
I press submit and we’re done here.
Install and configure a SMTP plugin
Back in the WordPress dashboard, the next thing I need to do is install a plugin that will replace the standard mail function used out of the box.
Historically, I have been using Post SMTP Mailer/Email Log by Yehuda Hessine (https://wordpress.org/plugins/post-smtp/) because it has a lot of advanced features. However, the developer recently wrote he is no longer able to maintain it, and soon after that, it was announced that a WordPress development agency called WPexperts have taken over the plugin support and development.
A more recent alternative is FluentSMTP (https://wordpress.org/plugins/fluent-smtp/), which has largely the same range of features. It misses the SMTP settings autodetection functionality of Post SMTP Mailer; however, it has native support for many popular 3rd party emailing services. Also, its interface is much more modern and less cluttered.
Both of the above mentioned plugins have a complete set of features and are available for free. Other plugins can do the job but most of them split functionality between a free and a paid version. I do not mind paying for quality software, but in this particular case, it is really not needed.
Since FluentSMTP is the more modern of the two plugins I mentioned, and due to the recent change of ownership over Post SMTP Mailer, I decided to make this post about FluentSMTP and use it for the configuration example.
Configure email service provider in FluentSMTP
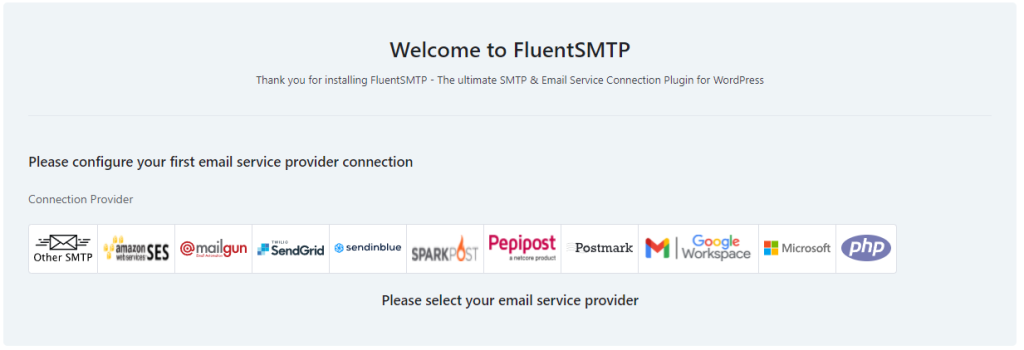
For this demo, I choose ‘Other SMTP’. The ‘PHP’ at the other end of the list is the mail functionality built into the webserver. The services between these two are reputable email sending services that will be necessary if the website ever needs to send emails in bulk (e.g. several hundred emails or more a day). For the time being though, a plain SMTP connection is all I need.
Fill sender details

I fill these fields as follows:
From Email: wordpress@optimizerable.com (of course, readers will supply the email address they created)
From Name: WP System
For these two fields, it is important to pay attention and observe the order. We people don’t think like computers and tend to type names first, and email address second. With email relay servers, it is the other way around.
I leave the two pre-selected options (‘Force From Email’ and ‘Set return-path to match the From Email’) enabled. I do not usually have to enable the third one, ‘Force Sender Name’.
SMTP Host and SMTP Port: These depend on the web hosting provider. I open my mailbox and look for a recent message from WPX Hosting with the subject “Your Email Account Details”.
I locate the section called ‘SSL encrypted connection settings’ and scroll down to ‘Outgoing server’. In my case, the SMTP server is uk4.wpxhosting.com, and the SMTP port is 465 for both SSL and TLS secure connections. I supply these values, choose SSL Encryption, and leave Auto TLS and Authentication enabled.
After that, there is a toggle called Store Access Keys in DB / Access Keys in Config File. It gives me the choice between storing my credentials within the database or keeping them in a separate config file.
The latter is considered a wee bit more secure alternative to the former; the database itself can be stored in many locations as part of backups, and in theory if it leaks out, these credentials will leak with it as well. The config file is considered safer because the hacker must specifically go look for it within the website structure, which might be more effort than is worth it. Store it in the config file it is.
SMTP Username: Unsurprisingly, my full email address is my username. It is mentioned in the message sent by WPX Hosting, just in case.
SMTP Password: I retrieve the password from where I stored it earlier and paste it there, then press Save Connection Settings at the bottom of the screen.
We are almost there! Now all I need to do is finalize the configuration and test email deliverability.
Finalize Email Send Configuration
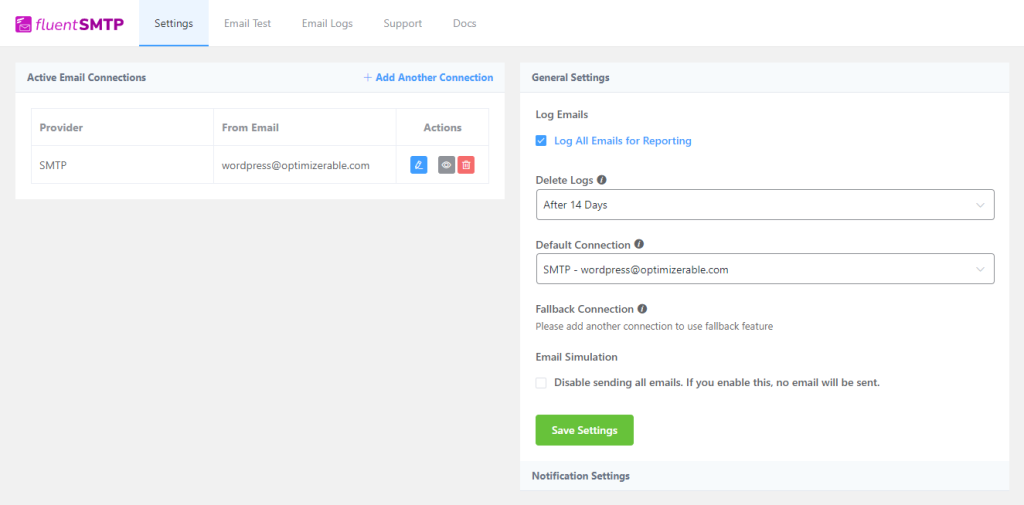
On this screen, on the left I see the SMTP delivery method I just configured; I can add more methods if I like.
I briefly go over the General Settings panel:
I leave ‘Log All Emails for Reporting‘ enabled, and increase the log retention from 14 days to 90 days (if I work on a website where it is important to maintain an email log, I will push that all the way to 2 years, which is the maximum).
‘Fallback Connection’ is disabled, because I don’t have another active email connection. But this is one of the great features of FluentSMTP (Post SMTP Mailer/Email Log has it too): I can configure it to have a primary and a fallback connection to make sure that no matter what, my emails will go out.
‘Email Simulation‘ is useful when I want to test other functionality that usually involves sending emails, but I don’t want to have these emails sent — for example when I want to tweak how and when WooCommerce sends confirmation emails. In normal use, “Disable sending all emails” should obviously stay unselected.
It is a somewhat weird UI decision, the Notification Settings field at the bottom is actually an accordion menu. I click on it and activate ‘Enable Email Summary’. The {site_admin} shortcode under ‘Notification Email Addresses’ is the email address entered under WordPress General Settings: Administration Email Address. I can add more email addresses (which I don’t) and select on which days to receive summary reports.
I configure every website I work for or manage to send me such reports once weekly. They are almost never interesting, but it is cheap insurance against somebody taking over the website and using it to disseminate spam. Save Settings and I am done here.
Testing Email Delivery
This is the moment of truth. All the work of the past quarter of an hour leading up to this: sending a test email. Most people will use the default settings and will send a message to the WordPress admin email which is conveniently pre-filled. However, even if this message arrives, it does not carry sufficient information about the website’s ability to reliably deliver email. So I go the extra mile and send a test elsewhere.
The service I rely upon for quick measurement of deliverability is Mail Tester (https://www.mail-tester.com). It performs a series of checks and offers a very detailed explanation for each problem it discovers. It is free to use for up to 3 tests a day, but I like it so much that I have purchased a big pack of testing credits to support the service.
I open Mail Tester in another tab and enjoy its nice illustration for a moment before I copy/paste the target email address into my SMTP plugin.

I leave HTML enabled and press the button to send the test email. And…
OUCH!!
What just happened?!

Don’t worry 🙂 If you have configured your WPX account to manage your DNS settings — which is what most WPX customers do — this will never happen to you. It only happened to me because I am lazy: I did not bother changing the nameservers for my domain to WPX and forgot to make the necessary settings (which are otherwise done automatically).
Let’s see the reason for the low score and I will explain.
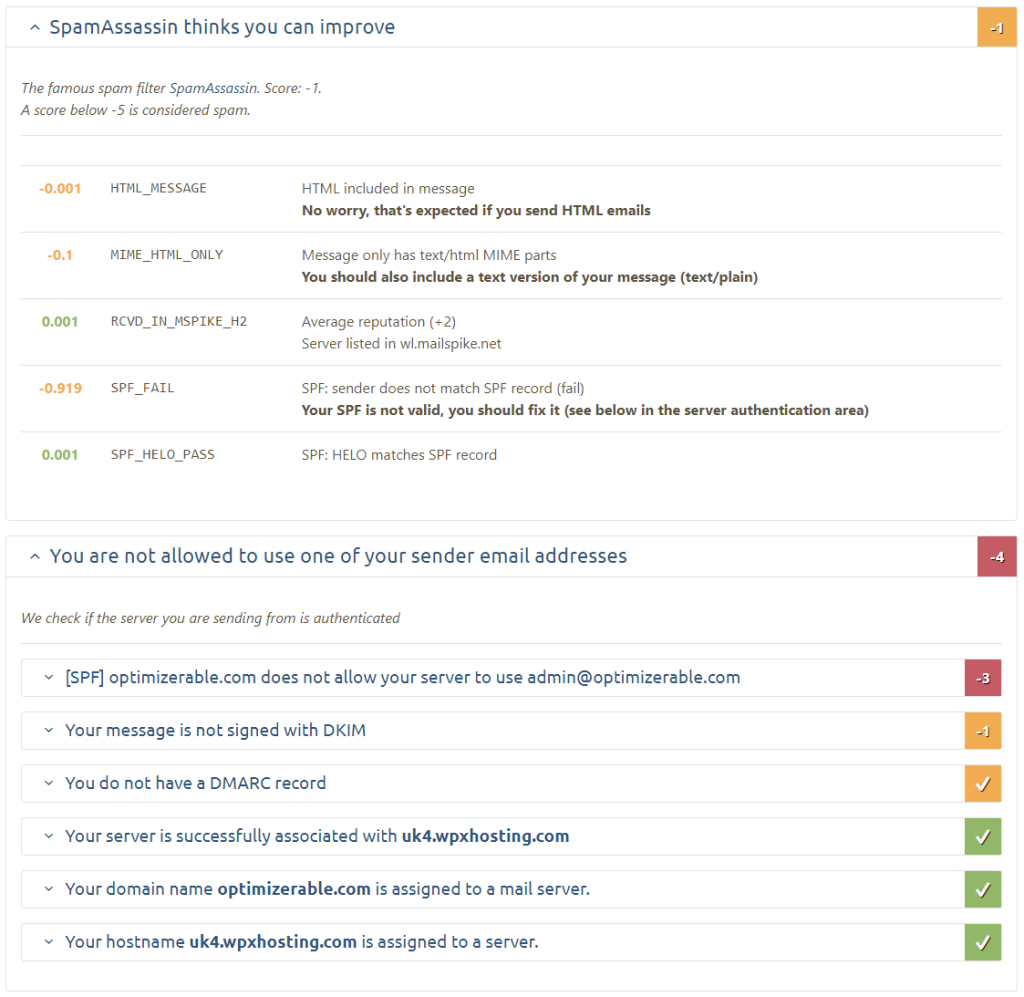
As you can see, I was docked 0.9 points by the SpamAssassin test because the sender IP is not included in my SPF record.
The Mail Tester diagnostic is telling me the same: the SPF record for my domain does not allow the WPX hosting server to send messages on my behalf, and this cost me another 3 points.
A further 1 point was reduced because my email wasn’t digitally signed with DKIM (I will talk about that later).
Mail Tester rounded that down to a full 5/10 to make me feel ashamed of myself.
What is an SPF record, anyway?
SPF is an abbreviation for Sender Policy Framework. Behind this pompous name sits the first organized attempt by the Internet industry to put an end to email spoofing (falsifying the sender details).
The SPF record is a special TXT record that includes a list of hosts, networks, and domains that are explicitly permitted to send email for a given domain. WPX will automatically manage the DNS records for the domains that have been transferred to them, and that SPF record would include the IP address of the hosting server which sends emails on behalf of the website hosted there.
Testing Email Delivery, Again
However, when setting up my WPX account and adding the domain optimizerable.com to it, I chose not to transfer the domain itself from my existing registrar. This means that I have to create or edit by hand all DNS records, including the content of the SPF record.
I opened my DNS zone editor, found the TXT record that contained my SPF policy, and added the IP address of the WPX host. DNS record changes take some time to propagate, so I stopped to make myself a cup of coffee and then re-sent the test email.

See? What did I tell you? Almost there. SpamAssassin no longer takes away 0.919 points due to SPF_FAIL, and I have recovered 3 points because my SPF record now allows the WPX hosting server to send emails on behalf of my domain.
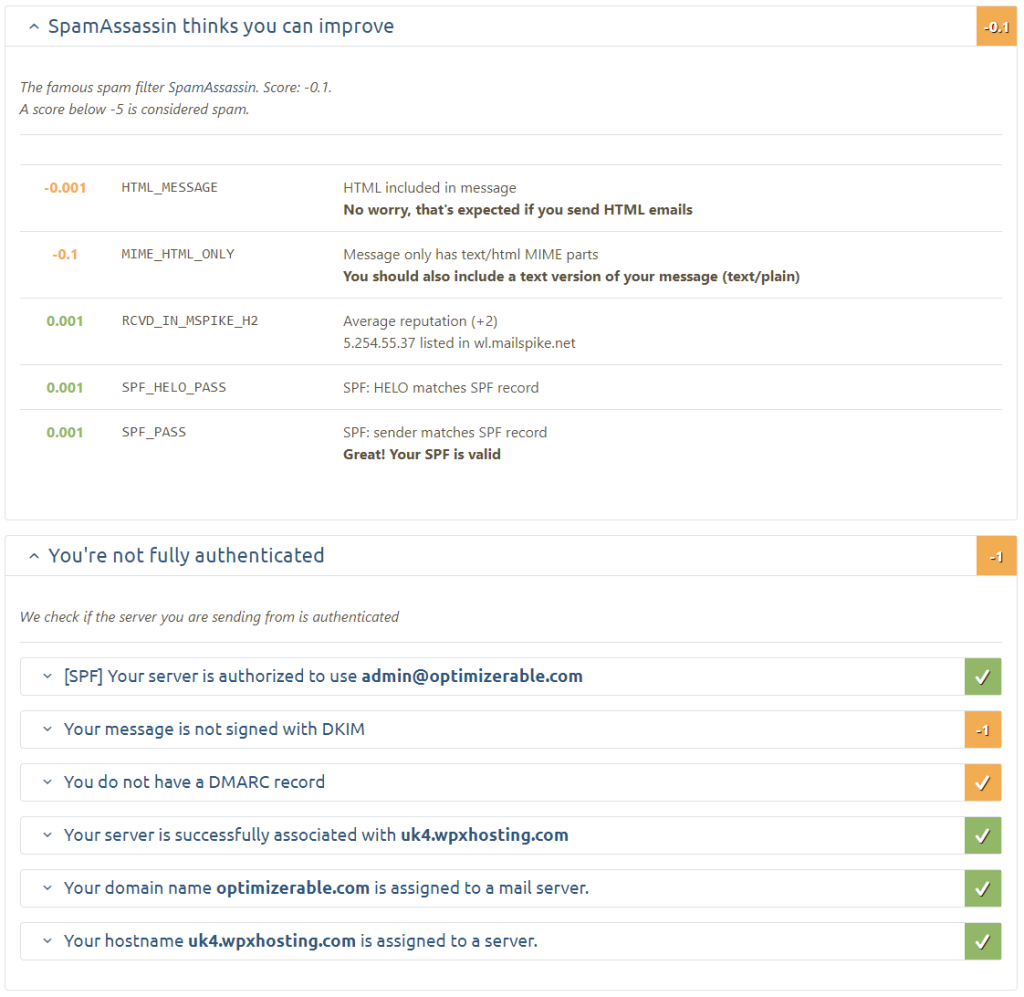
Side note: the 0.1 point penalty because of MIME_HTML_ONLY warning is an artifact of the way FluentSMTP sends test emails. These indeed contain only an HTML part, whereas the good modern practice is to have the email body sent both in text-only and HTML format so that it is compatible with both older email software and modern devices.
Thankfully, both WordPress Core and the most popular plugins that send emails have this capability. So in practice, we can easily achieve a 9/10 score in Mail Tester.
The only thing that isn’t fixable so easily is the matter with DKIM.
And what does a DKIM record do?
DKIM stands for DomainKeys Identified Mail. This is another measure similar to SPF but with a different purpose. The SPF record is a list of permissions; a DKIM record serves to verify the cryptographic signature of an outgoing message.
The premise of this measure is that when you receive a digitally signed message from me, your mailbox provider can look up the public key in the DKIM record of the sending domain and validate the signed message against it.
If the validation goes through, it is assumed that the owner of the domain controls the private key used to sign that message, and since the corresponding public key is listed in a DKIM record, then the email message itself is legit.
Unlike SPF records, where you may use only one record per domain, you can have multiple DKIM records.
The last thing that you need to know about DKIM is that it does not encrypt the email content itself. The only purpose of DKIM is to prove that a mail server has authorization to send email on behalf of a domain. The emails themselves are not encrypted or otherwise protected from viewing in transit.
How to enable DKIM?
Enabling DKIM is the responsibility of the hosting service. The administrator will generate a cryptographic pair (a private and a public key). The mailer program uses the private key to sign outgoing emails for the given domain. A specific TXT record holds the public key. It looks like this:
selector._domainkey.example.com TXT v=DKIM1;t=s;p=MIIBIjANBgkqhkiG9w0BAQEFAAOCAQ8AMIIBCgKCAQEA3OGBlkdCyRDrD2WNwNRe2B3lfEd3+L9quFzVskVEslg0kX/9k63vGhoOpPv1M5+asVs2T5/Ea5CvpZnvNEiANkcT1bZyQrHU1XqLZPmwm9+30+cIYB3imB/+wWnlqeN2mqV+/XXmDQmcQMyhwWq5paycunccv6cgYncC+AGXnb5pfc9JUCQUwC9/6CoRKHQ86CtmIH73WIcWbQuJkWcnwlR1kDFKxaonMdoGUjRfUZVkkpFbLTOzVmJw8LdhDJOmV03gJQruwOrFDWZA+CPSAr41/x/E/FIV7yIMzsNEVXW22z4in6lUvwZ2dv2ZT7e+gSw+3vwNmcweNKoOOGTaBQIDAQABwhere selector identifies the key which is used to sign a message. Multiple DKIM records are associated with one domain, hence the need for selectors. example.com of course stands for your domain name.
Most hosts that use Cpanel and DirectAdmin will have this configured out of the box. Regretfully, the WPX is missing out in this aspect: their own mailer service is not configured to use DKIM out of the box and is unable to generate the set of keys for the domain from anywhere in the client area.
It is quite possible that if you escalate the issue, WPX will be able to configure DKIM for you. But should you do it?
Why bother with DKIM at all
I hope you will believe me when I tell you from experience that this is a waste of time. Most modern ISPs allow email if either SPF or DKIM is set up. No commercial email provider like Gmail, Zoho Mail, Hotmail, Yahoo, iCloud, et al. would block an email that has a valid SPF record but is missing DKIM.
If you insist on improved deliverability, you will want to use a separate service for sending and receiving emails in bulk anyway. Once you approach the rate of 50-100 emails a day, it becomes an almost certain necessity.
The amount of effort needed to ask WPX to configure DKIM for you and follow up with them until it gets done is likely comparable with signing up for a 3rd party email sending service. Adopting such a service comes with a lot of extra benefits.
I have planned a whole article that compares several reliable providers; some of these have very generous free tiers, which will make migration very simple. Until then, rest assured that you have done a lot to improve the deliverability of your emails and reach your readers and customers without issue.
Recap
In this article, I showed you how to replace the built-in mail sending capabilities of WordPress with a more powerful mail delivery system that could either (a) use the SMTP protocol to send properly authenticated emails on your behalf or (b) connect to a 3rd party transactional mail delivery system, when this becomes necessary.
An additional advantage of replacing the WP mail function with a proper email sender is the ability to send test emails and keep a log of sent messages (including those that failed to reach their recipient). You can use this log to troubleshoot the issue and re-send these emails if necessary.
By following the instructions in this article, you have put yourself on the path of reliable email delivery. Congrats!