The WPX Control Panel has been redesigned to make website and hosting management faster, clearer, and easier for everyone, from beginners launching their 1st website to experienced developers managing multiple domains. In this tutorial, we’ll walk you through everything you need to know to confidently use the new WPX Control Panel and get the most out of your WPX hosting account.
Whether you’re managing websites, setting up emails, checking backups, or contacting support, the updated panel brings better organization, simpler navigation, and more functionality at your fingertips.
What Is the WPX Client Area?

The WPX Client Area is your central hub for managing everything related to your WPX hosting account, including hosting plans, domains, security, payments, and more. It provides a clean, intuitive interface designed to simplify daily tasks.
Each hosting plan within the Client Area comes with its own dedicated Control Panel, where you can easily manage websites, create email accounts, access backups, install WordPress, and handle technical settings.

Unlike traditional hosting dashboards that can be overwhelming or overly complex, the WPX Client Area is built with a strong focus on usability, speed, and simplicity. Whether you’re a beginner or an experienced website owner, it’s designed to help you work more efficiently without getting lost in cluttered menus or complicated configurations.
Logging In to Your WPX Account
To access the WPX Client Area, go to wpx.net and click on Login. Ener by using your registered email address and password. If you’ve forgotten your password, use the “Forgot password?” link to reset it securely.
Exploring the WPX Home Page: Your Account Overview at a Glance
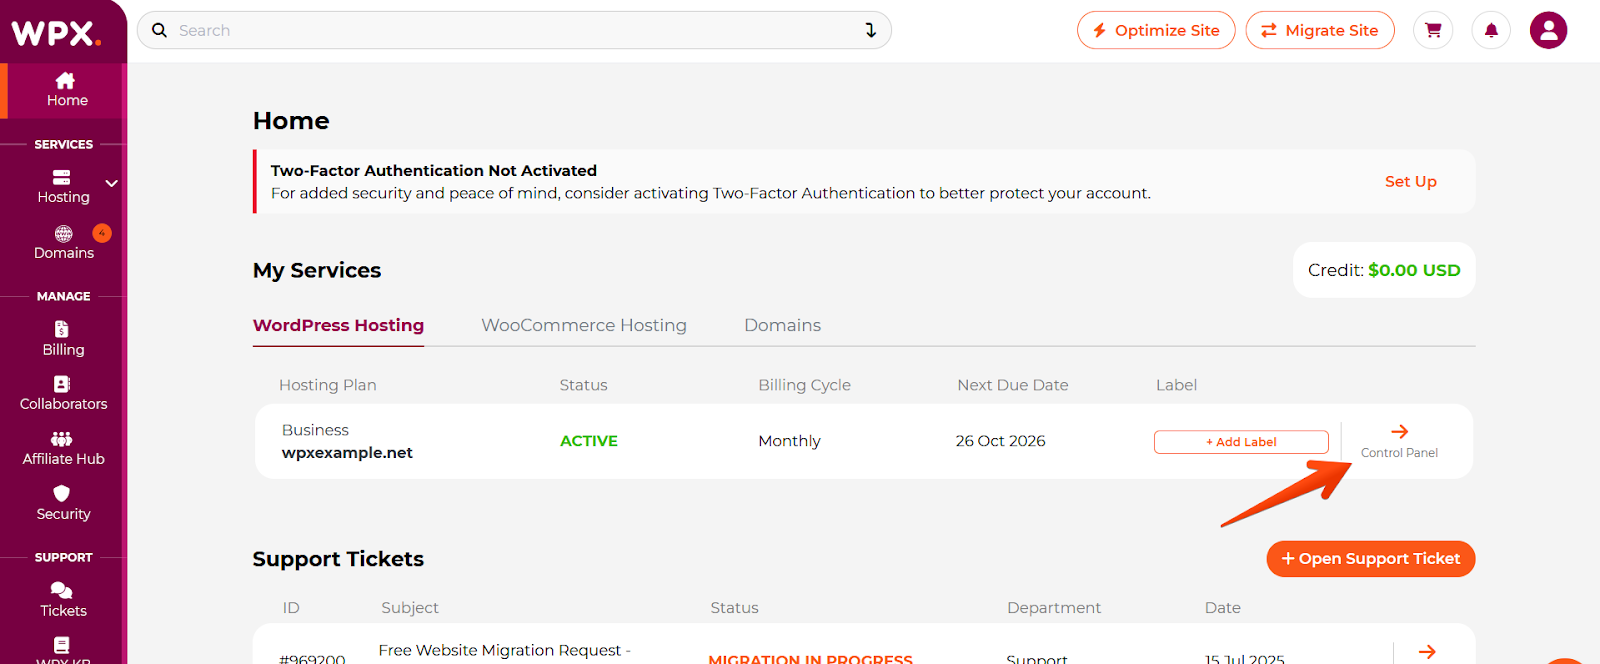
Once you log in to your WPX account, you’ll land on the Home Page, a centralized dashboard that gives you a quick overview of everything important related to your WPX account. It’s designed to help you stay organized, informed, and ready to take action in just a few clicks.

The WPX Home Page is divided into four key sections:
- Important Notifications: This section highlights updates, announcements, and any urgent messages related to your WPX account.
- Invoices Due: Easily view and pay any outstanding invoices. This area provides a direct and convenient way to stay on top of billing without navigating through multiple menus.
- My Services: Access your WPX services, including WordPress Hosting Plans, WooCommerce Hosting Plans, and registered Domains. It’s your starting point for managing websites, checking plan details, and launching into the Control Panel.
- Support Tickets: Quickly review your recent support tickets or open a new one. Whether you’re following up on a request or reaching out for help, this section connects you directly to WPX’s support team.
The Home Page gives you a clear, organized snapshot of your account, allowing you to manage core actions efficiently from the moment you log in. It’s all designed to save time and help you focus on growing and maintaining your websites.
Navigating the WPX Dashboard: Side Menu and Top Bar Overview
The WPX Client Area is designed with a clear and user-friendly layout that makes it easy to access everything you need. The main navigation is divided into two key areas: the side menu and the top bar, both structured to help you move through your account quickly and efficiently.
Side Menu: Your Main Navigation Panel
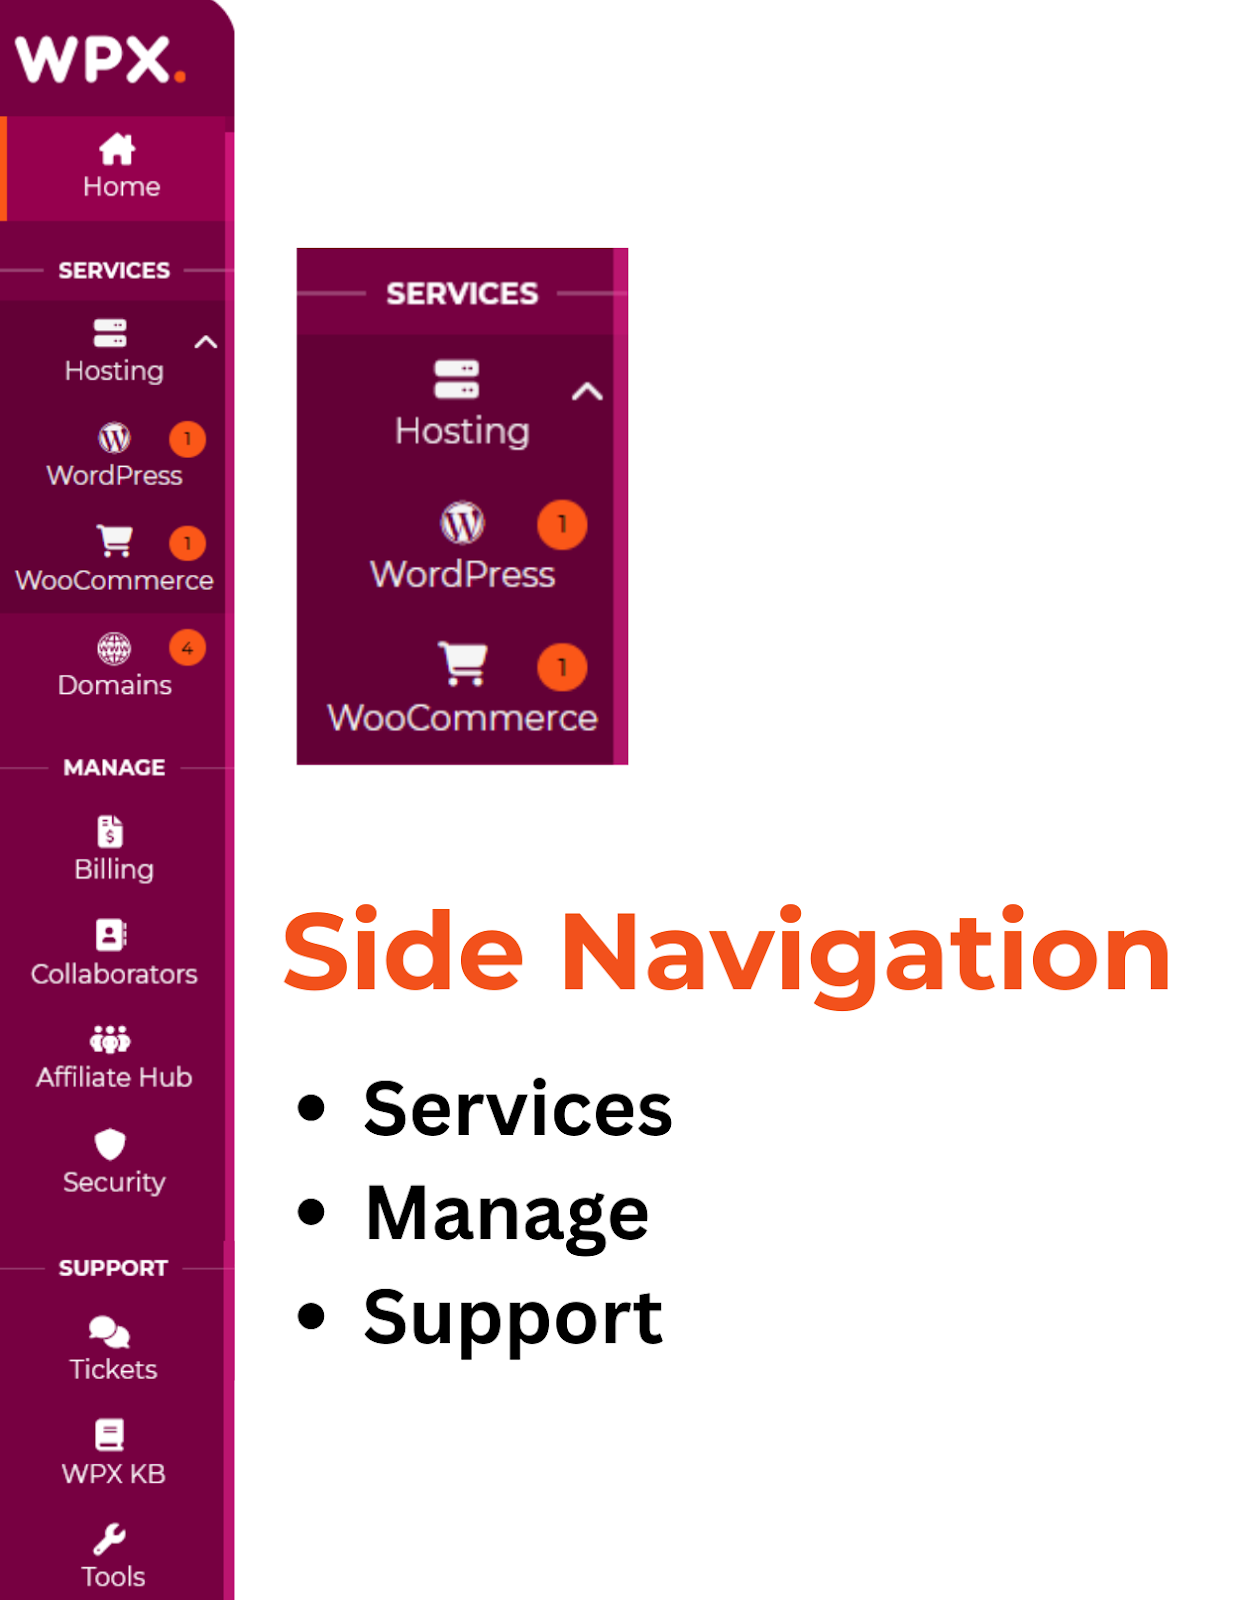
The side menu is the primary way to explore your WPX account. It’s grouped into logical sections for easy orientation:
- Home: The first section, and the one you land on after logging in. It gives you a full overview of your account with notifications, invoices, services, and support ticket previews.
- Services: This section covers your core WPX services.
- Hosting: View and manage your WordPress or WooCommerce hosting plans.
Domains: Manage domains you’ve registered or transferred to WPX.
- Hosting: View and manage your WordPress or WooCommerce hosting plans.
- Manage: A set of tools related to your WPX account.
- Billing: Access your invoices, payment methods, and billing history.
- Collaborators: Manage access for teammates or developers through WPX’s collaborator system.
- Affiliate Hub: Track your affiliate performance, commissions, and referral tools.
- Security: Manage 2FA (two-factor authentication) and other account security features.
- Support: Everything related to customer assistance.
- Tickets: Submit, view, or reply to support requests.
- Knowledge Base (KB): Quick link to the WPX KB: Search helpful guides and tutorials for common questions.
- Tools: Access helpful utilities provided by WPX, such as downloadable pre-configured settings for cache plugins and plugin recommendations.
Each section is clearly labeled and designed to minimize the learning curve, even if you’re new to hosting.
Top Bar: Search, Actions, and Account Settings
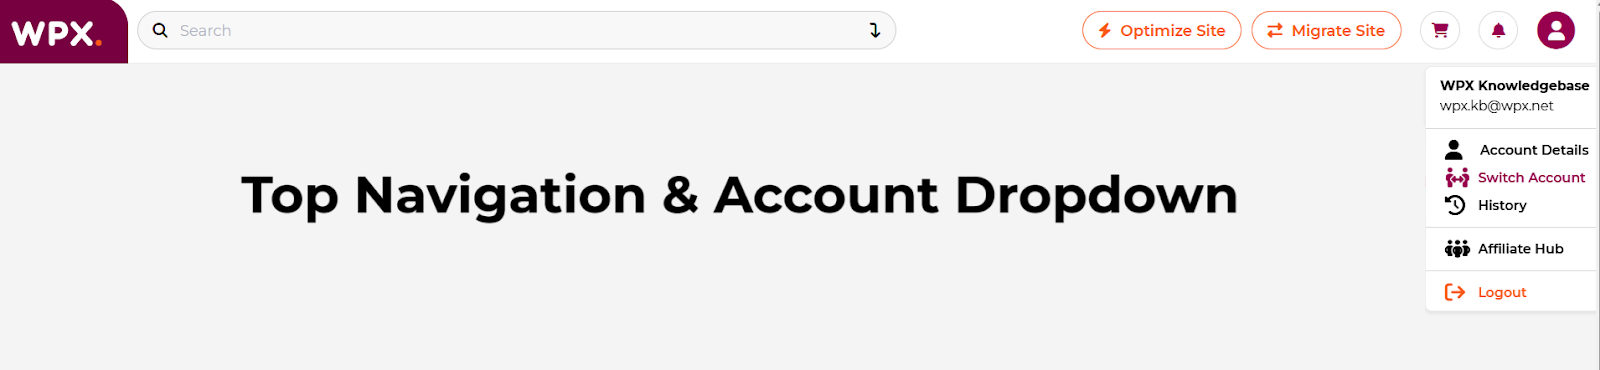
At the top of the Control Panel, you’ll find the top navigation bar, which includes quick-access tools and shortcuts to frequently used actions:
- Search Bar: Easily find services, domains, or KB articles within your WPX account.
- Migrate Site & Optimize Site: Instantly start a website optimization or launch a site migration, two of WPX’s most popular services.
- Notifications: View updates, system alerts, and important messages.
- Cart: Check out items you’ve added for purchase, such as additional services or domains.
- Account Menu Dropdown: A dropdown menu offering access to key account functions, including:
- Account Details: Edit your personal or business information associated with your WPX account.
- Switch Accounts: Toggle between accounts if you’re a collaborator on multiple WPX accounts.
- History: Review login records, session activity, and changes made to your account.
- Affiliate Hub: Quickly jump into your affiliate dashboard to view earnings and performance.
- Logout: Securely log out of your WPX account when you’re done.
This dual-navigation system side menu for deep navigation, top bar for quick actions, helps make the WPX Client Area both complete and easy to use. Whether you’re managing websites, billing, or affiliate activity, everything is right where you expect it to be.
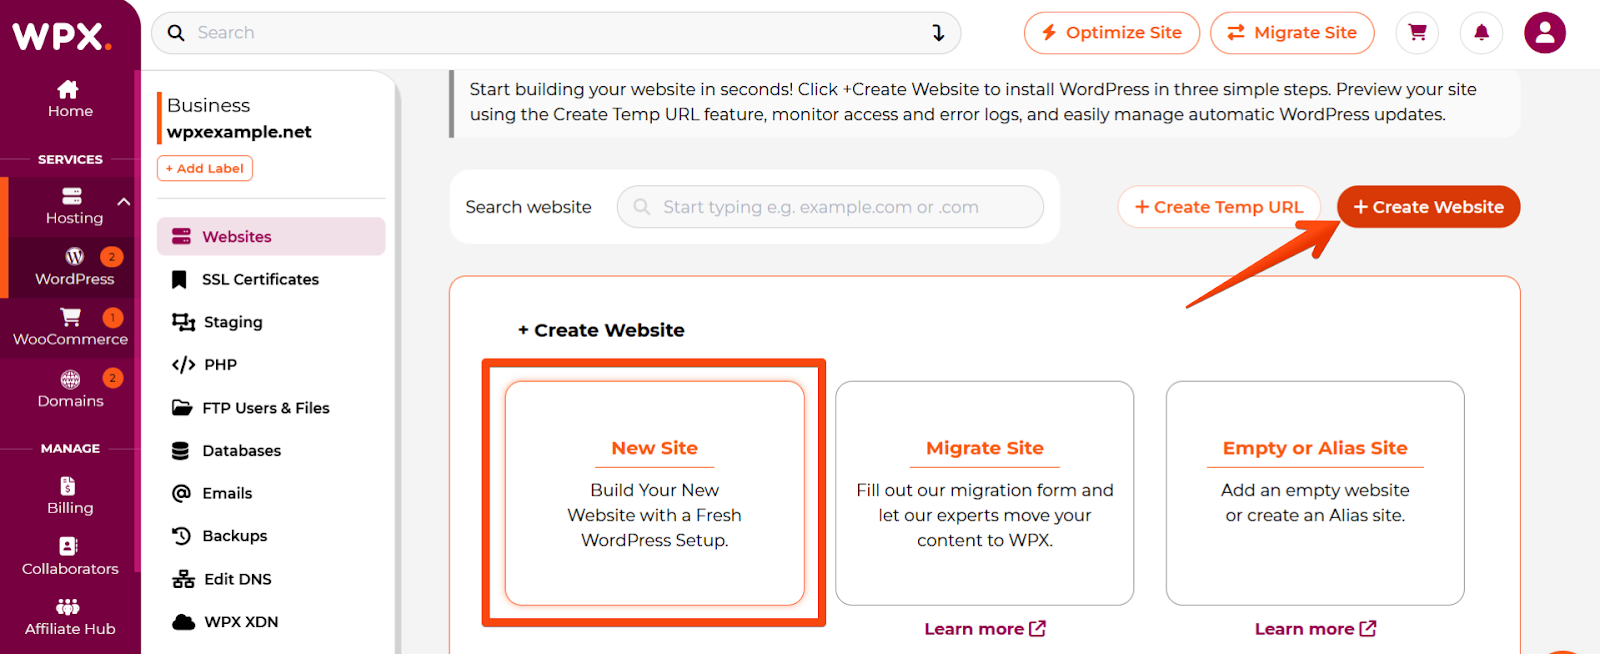
Adding Websites
To add a new website to your WPX hosting plan:
- Click on Control Panel from the client area.
- Select Create Website and then New Site to add a site with a fresh WordPress installation.
- Fill in your Site Setup information (make sure the domain is pointed to WPX’s nameservers).
- Click Create to confirm.
A more detailed guide can be found in our knowledge base here.
Once the website is added, you’ll see several action buttons next to it.

These actions include:
- WP Admin: Easy access to the WP Admin area of the site.
- WordPress: Install WordPress in a subdirectory or reinstall if needed. Manage WordPress automatic updates for plugins, themes, and core.
- Logs: Preview Access and Error logs for your site.
- Settings: Turn off or on WPX Email Service and Enable Multisite Network Installation.
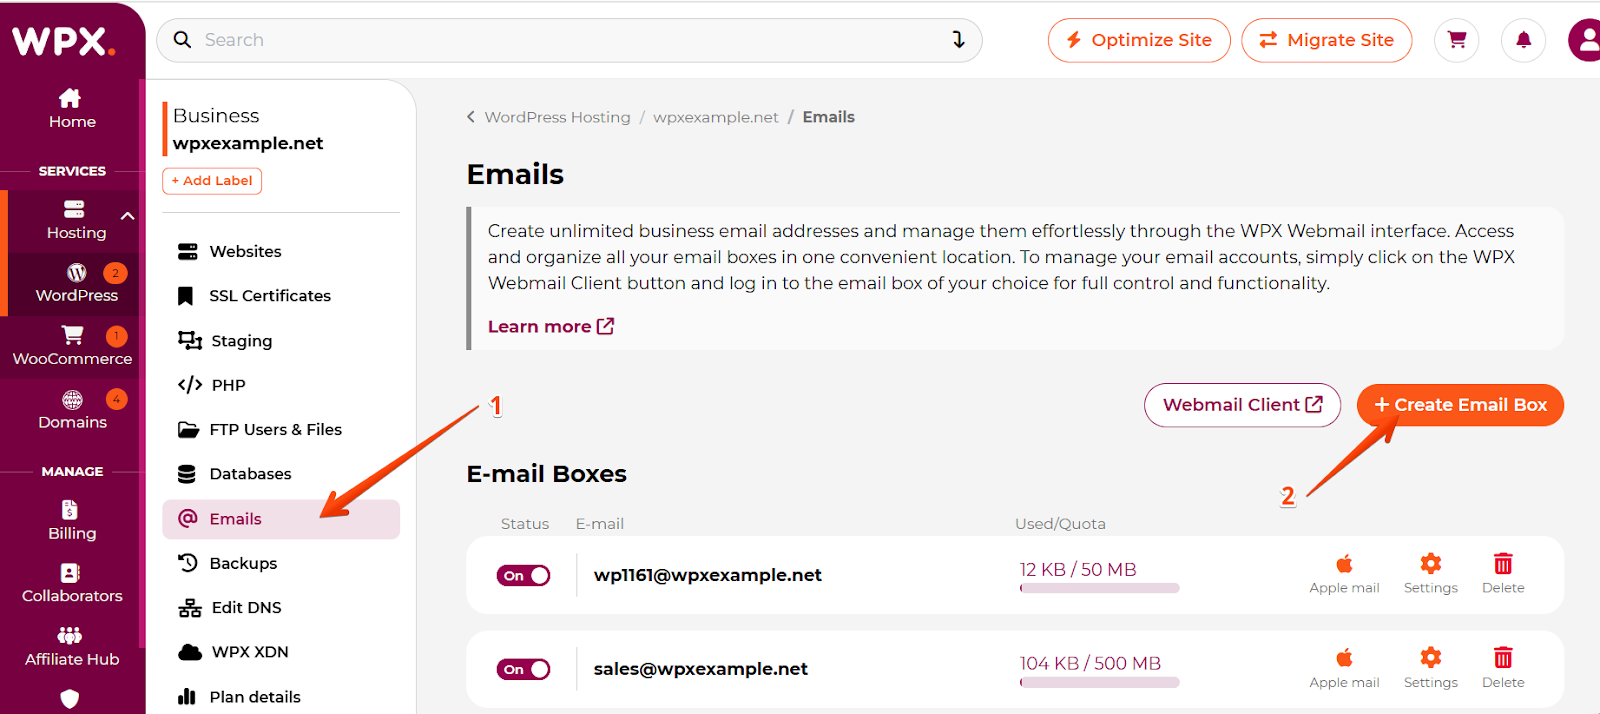
Setting Up Professional Email Addresses
WPX includes free email hosting with every hosting plan. You can create personalized email addresses (e.g., contact@yourdomain.com) for yourself or your team.
Here’s how to create an email box:
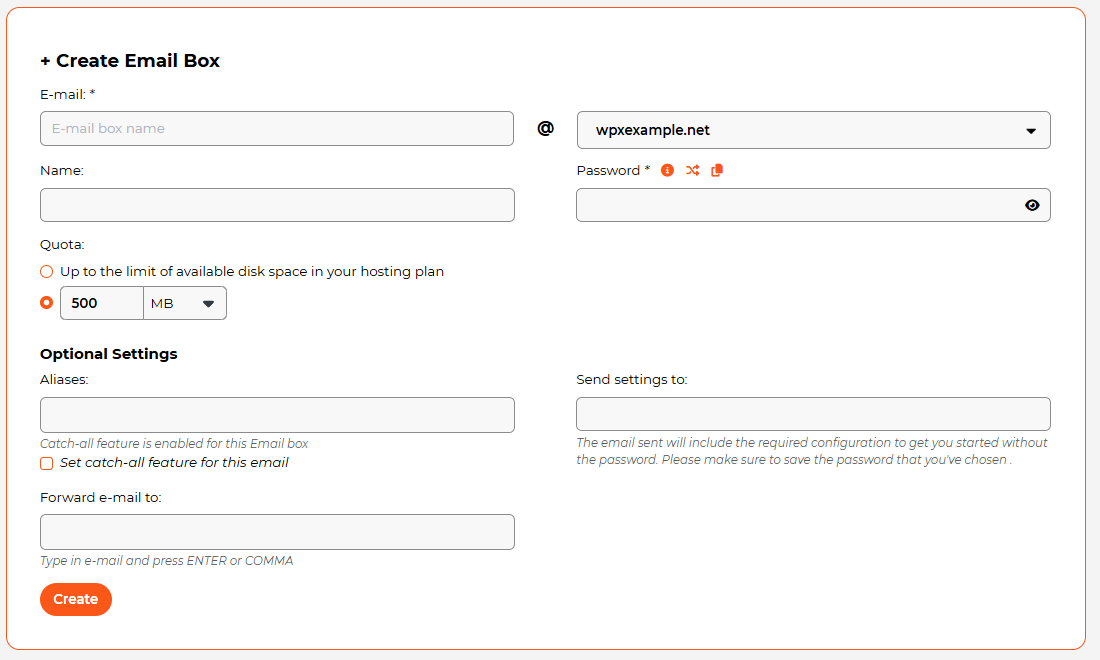
- Click on Emails from the dashboard.
- Select Create Email Box.
- Set up the details for your Email account.
- Click Create.
Once created, you can access your email through WPX Webmail or connect it to popular clients like Gmail or Outlook using IMAP/SMTP settings, which are listed in the Email Box details.
A more detailed guide can be found in our knowledge base here.
Creating & Downloading Backups
WPX automatically creates daily backups of your websites and stores them for 28 days. These can be incredibly helpful if you need to restore a site after accidental changes, plugin conflicts, or other issues. Automatic backups are available for restoration only.
If you want to create & download a backup, you can do that using Personal Backups.
To create backups:
- Click Backups.
- Select the site you want to back up.
- Click Create Personal Backup. Select Full Backup to back up files and database(s).
- That’s it, you’ll receive a on-screen notification when your backup is ready.
To download the backup, select the download action button next to it.

A more detailed guide can be found in our knowledge base here.
Setting Up and Using Staging Sites
Staging sites let you safely test changes like plugin updates, design edits, or new content, without affecting your live website. They’re a must-have for anyone wanting to avoid downtime, errors, or broken layouts during development.
With WPX, staging is built into your Control Panel and only takes a few clicks.
To create a staging site:
- Navigate to the Staging section.
- Click the Create Staging button, and a new section will appear.
- Select the Live site from the dropdown menu for which you want to create the Staging area.
- Click on the Create button.
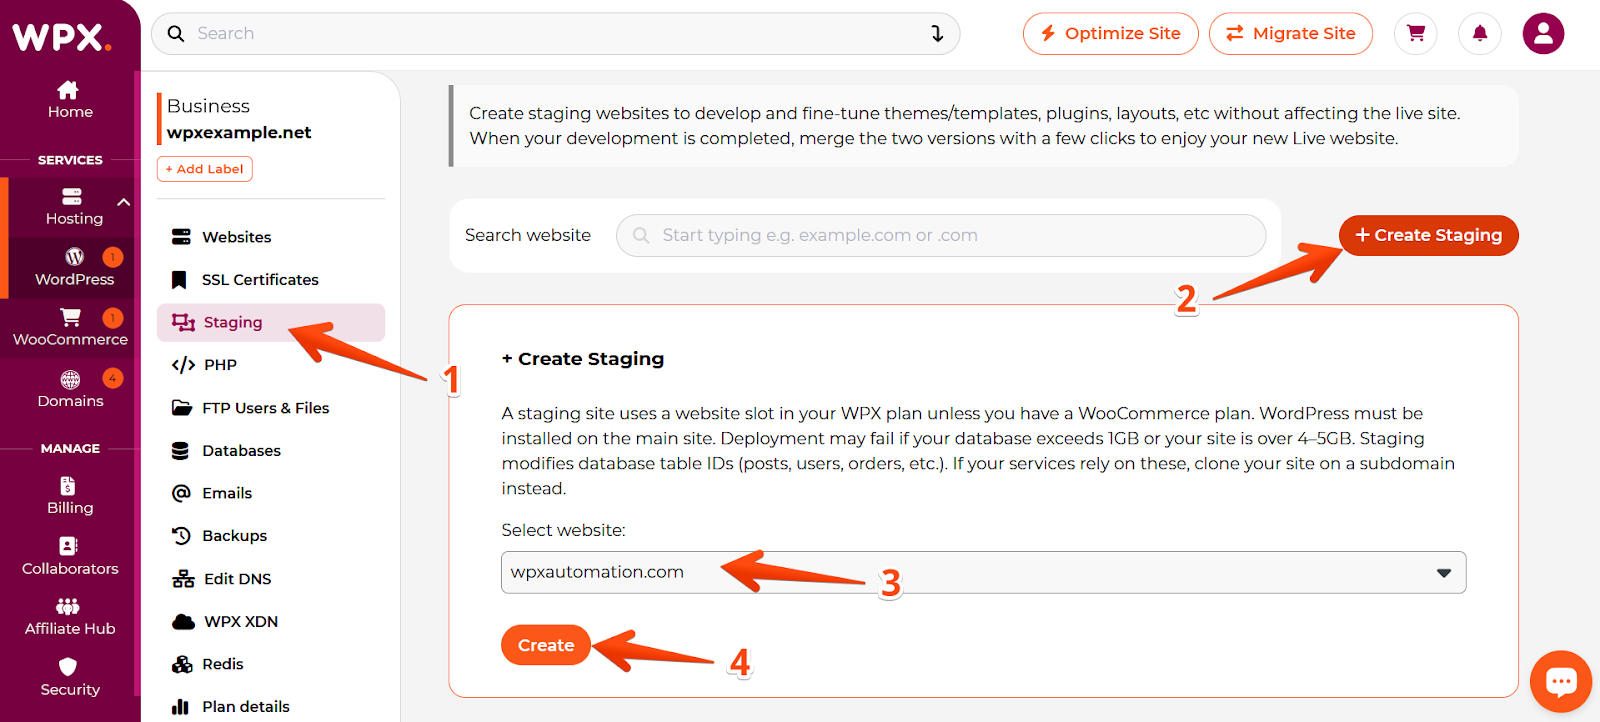
Your staging site will appear as a subdomain (e.g., staging.yoursite.com) and can be accessed directly from the Control Panel.

To push staging changes live, click on the Deploy button next to the staging website.
More about staging can be found here.
Accessing and Contacting Support
WPX is known for its fast and reliable customer support. You can get help at any time of day directly from the Control Panel.
To contact support:
- Click on Tickets from the side menu.
- Choose Live Chat for real-time assistance.
Support requests are handled quickly, with average response times often under 30 seconds for live chat.
Final Thoughts
The new WPX Control Panel was designed with one goal in mind: to make managing websites and hosting as seamless as possible. With its clean layout, improved speed, and powerful built-in tools, it removes much of the friction found in traditional hosting dashboards.
Whether you’re launching your first site or managing a portfolio of clients, the WPX Control Panel provides a reliable, efficient platform to handle everything in one place. As always, if you ever need help or have questions, the WPX support team is only a click away.
If you haven’t explored the new dashboard yet, now is the perfect time. Log in at wpx.net and experience a better way to manage your online presence.
Frequently Asked Questions

Absolutely. The Control Panel is fully responsive and optimized for smartphones and tablets. You can manage your hosting, check notifications, or contact support on the go, directly from your browser no separate app needed.
Yes. You can access all your invoices from the Billing section, where you can view, download, and pay them securely. It also allows you to update payment methods and manage billing history in one place.
Yes! The WPX Control Panel is designed with simplicity and clarity in mind. Whether you’re launching your first site or want to avoid technical clutter, the interface is intuitive, clean, and easy to navigate.