Making the switch from Shopify to WooCommerce? You’re not alone—it’s a popular move for online shop owners who want more flexibility, control, and, yep, even a little extra cash in their pockets. WooCommerce, the open-source superstar of WordPress plugins, gives you near-endless options to customize your store’s look, feel, and features. It’s perfect for businesses ready to grow and stand out!
But let’s be real: migrating from Shopify to WooCommerce takes a bit of planning to make sure things go smoothly. We want you to keep all your data safe and your SEO rankings intact—no one wants to mess that up!
In this guide, we’ll cover everything you need for the big move. From prepping your data to setting up WooCommerce and styling your shiny new store, we’ve got all the tips and tricks to help you glide through the process like a pro (or at least look like one!). So buckle up, and let’s get you ready for the WooCommerce world!
Why you should consider moving your site from Shopify to WooCommerce?
Let’s start with some of the main potential benefits:
- Enhanced Flexibility and Customization: WooCommerce offers a higher degree of flexibility and customization compared to Shopify. This means that you can tailor your online store more precisely to your unique requirements and provide a truly personalized experience for your customers.
- Easily Back Up Your Store with WooCommerce: Unlike WooCommerce, Shopify does not offer a built-in backup solution, which can be a drawback for businesses relying on secure data management. WooCommerce, as a self-hosted platform, allows users to create regular backups of their entire site, giving them full control over data recovery in case of accidental deletions or technical issues. In contrast, Shopify’s hosted environment lacks a native backup option, requiring users to rely on third-party apps to ensure data protection and restore capabilities.
- Total Ownership and Control: With WooCommerce, you gain complete ownership and control over your website. This level of control is especially valuable for businesses that want to have a hands-on approach to their online presence.
- Integration with WordPress Ecosystem: WooCommerce seamlessly integrates with the WordPress ecosystem. This provides you access to a vast array of plugins and themes that can enhance the functionality and appearance of your online store. It allows for a more tailored and comprehensive approach to meeting your specific business needs.
- Content Marketing Synergy: If content marketing plays a crucial role in your strategy, WooCommerce, being part of the WordPress platform, allows for a seamless integration of content and commerce. WordPress is renowned for its blogging capabilities, and combining this strength with your e-commerce site can result in a more integrated and effective marketing strategy.
- Scalability for Future Growth: WooCommerce is known for its scalability. As your business grows, WooCommerce can easily adapt to increased demands and provide a scalable solution for expanding your online presence.
Now that you’re familiar with the benefits of using WooCommerce, let’s guide you through the migration process.
Back up your Shopify store
When migrating from Shopify to WooCommerce, creating a backup of your Shopify store is a crucial first step to ensure data security. Shopify does not offer a built-in backup option, so it’s important to manually export your store data, including products, customer details, and orders. Use Shopify’s export features to download CSV files of each data type and, for extra security, consider using a third-party app for automated backups. This backup will serve as a safeguard, allowing you to restore your Shopify store data in case of any migration issues, ensuring a smoother transition to WooCommerce.
How to Еxport Shopify Data?
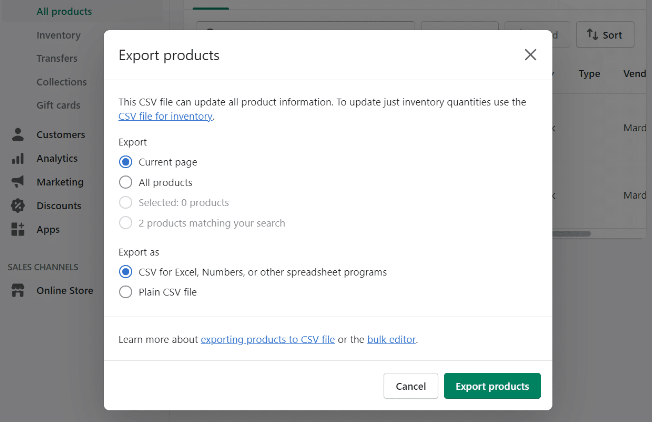
To migrate your products from Shopify to WooCommerce, start by exporting your Shopify product data. In your Shopify admin dashboard, go to Products, then select Export. Choose to export All Products to a CSV file format, as this file will contain essential product details like titles, descriptions, prices, and inventory information:
Make sure to select the appropriate CSV format for your needs, as WooCommerce accepts both Shopify’s default CSV or a custom file format. This CSV file will be key for importing your products into WooCommerce, simplifying the transfer, and helping to maintain data accuracy.
Set Up WordPress and WooCommerce
To begin the migration from Shopify to WooCommerce, you’ll need to secure reliable hosting, such as WPX, to ensure optimal performance and support. We also recommend trying out ourWooCommerce hosting plans, designed specifically to meet the needs of growing e-commerce businesses and make the transition smooth and efficient. Here at WPX Hosting, we have a fully automated process for installing WordPress.
Once you have WordPress installed on your site you need to install WooCommerce. To do so, go to Plugins > Add New and type “WooCommerce” in the search bar at the top of the screen. Once you see the WooCommerce plugin just click on the “Install Now” button:
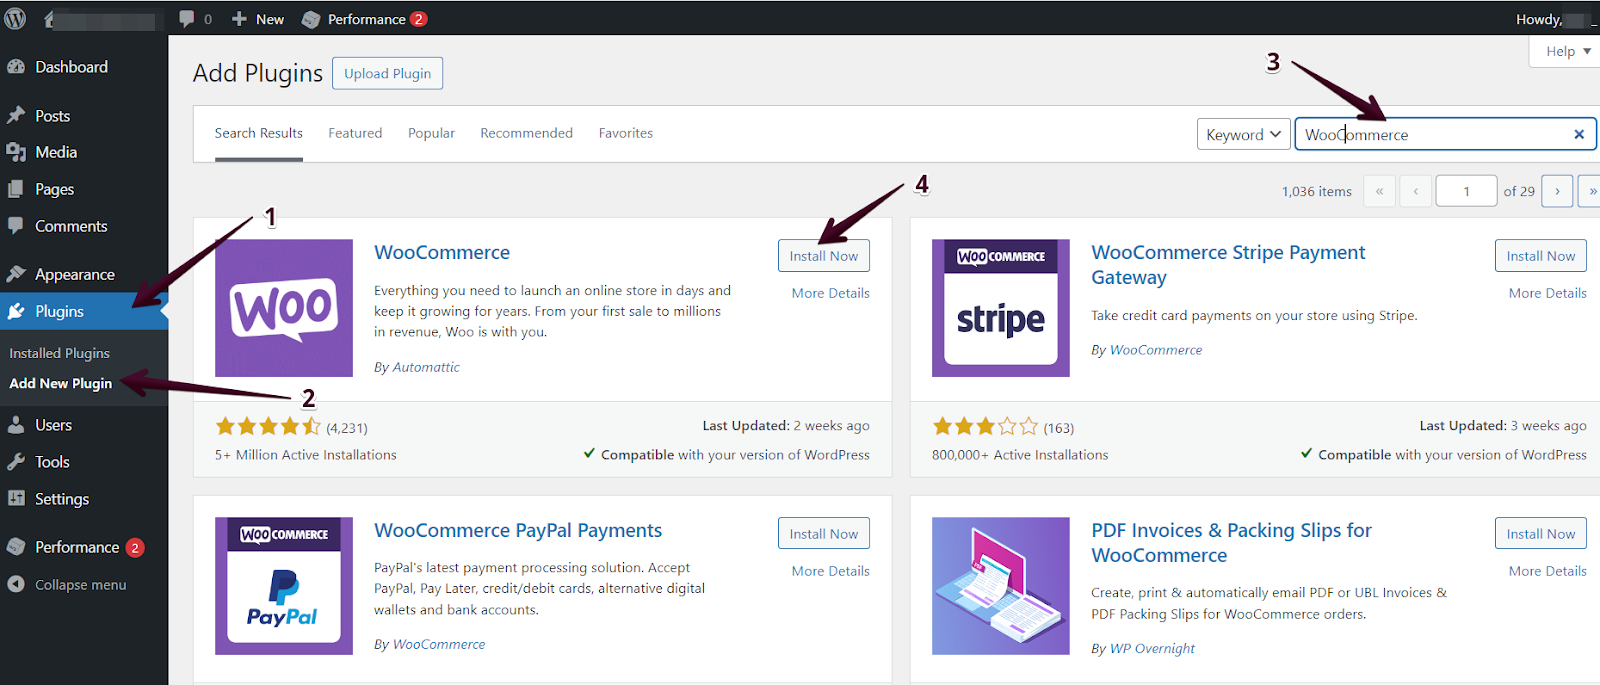
This process of downloading and installing the WooCommerce plugin will happen in the background, so don’t leave the page until the “Activate:” button appears next to WooCommerce:

Once it does, click on it and that’s it! Now WooCommerce is up and ready to go. That means you can start publishing and selling products.
But first, let’s see how to export the products from Shopify.
How to import Data into WooCommerce?
There are two ways that you can import Shopify products into WooCommerce. One method is to use the built-in product importer that WooCommerce has, and the other is through a migration service.
In this article, we’ll check the first method using the WooCommerce Product Importer. It’s very important to know that if you select this method you’re only importing products. All of your store’s data, such as customers, order history, images, and reviews, will remain in Shopify.
In essence, you’re starting over using WooCommerce with your existing inventory and a blank store slate.
However, if this is not a dealbreaker for you let’s check how to import that CSV file from the previous step.
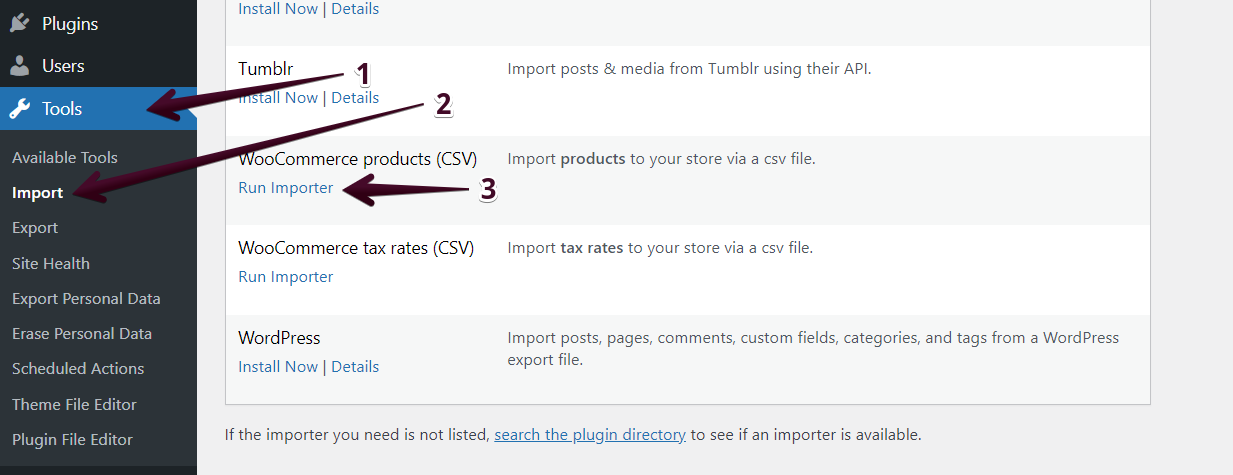
First, you need to select Tools then Import settings, and choose WooCommerce products (CSV) Run the Importer button:
On the next page, WooCommerce will ask you to choose the file you want to import. There’s also an option for updating existing products using the data from a CSV file. You can leave that box unchecked.
Then you need to press the Choose File button, select the CSV file, and click on Continue.
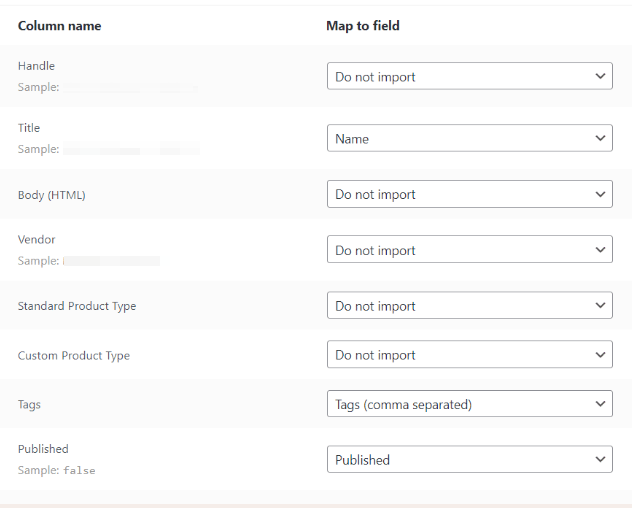
The next screen includes a couple of options for matching product data from the CSV file to WooCommerce fields:
Once you’re happy with your choices, click on Run the Importer. WooCommerce will take a minute (or more) to import your Shopify product data. When the process is over, you’ll see a success message.
Please remember that WooCommerce won’t import product images, so you must upload those manually. It’s highly recommended to check out each item entry to ensure it’s not missing any critical information.
If product data is missing, you can always rerun the importer and make sure you’re porting the correct fields to WooCommerce. Overall, using the manual importer is not complicated, but it requires some micromanagement on your end.
Of course, you can always use a Service to Import Shopify Data into WooCommerce. There are entire plugins and services devoted to simplifying the process. The advantage of using Shopify migration tools is that they automate the whole process andenable you to port data that you can’t with a simple CSV file. Such tools for example are Cart2Cart, Amasty etc.
Point Your Domain to your WooCommerce site
You should already have a fully working WooCommerce store that includes all of your Shopify products. However, there are still a couple of things left to do, including updating your domain records since currently, your domain is still pointing to your Shopify store.
If you registered a domain directly through Shopify, you’d need to edit your DNS settings using the platform. Alternatively, some web hosts such as WPX enable you to update your domain records from your hosting control panel.
Of course, if you have any issues pointing the domain to WPX you can always contact our friendly support staff team and they will assist you with everything you need.
Configure Your WordPress Permalinks
WordPress enables you to decide your URL structure, including for WooCommerce products. The default WordPress URL structure is usually not very user-friendly and also it’s not SEO-friendly.
To change your store’s URL Structure, go to Settings > Permalinks > Product permalinks and select the option that you prefer:
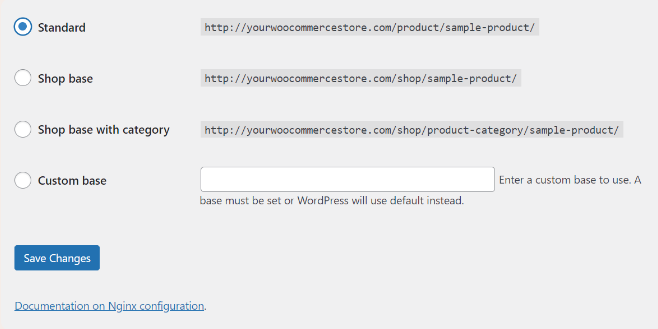
The option that is recommended is the Standard structure.
It’s important to note that you need to choose a permalink structure when starting your WooCommerce store. Changing link structures at a later point can impact your site’s SEO and cause errors within your website.
Recreate Your Shopify Store’s Design
At this point, you’re still using one of the default WordPress Themes so basically you have two options for how to approach your new design:
- Recreating the style of your Shopify store
- Starting over with a new WooCommerce template
Both options are great so it’s really up to you and your decision on how you want your store to look.
Configure Your WooCommerce Settings
Importing products into WooCommerce and customizing your store’s style is just the beginning. Before you can start selling products via WooCommerce, you still need to configure a variety of settings, such as:
- Payment and shipping options
- Security settings
- Email notification options
- Product settings
- Tax options
The official WooCommerce documentation includes a complete guide on how to configure its settings.
Wrapping Up
Switching your site from Shopify to WooCommerce might feel like a big task, but with the right plan and some careful steps, you can make the move smoothly. Following this guide will help you transition with minimal hiccups, so your store stays up and running.
Once you’re on WooCommerce, you’ll have the flexibility and customization to build an online store that really fits your business needs. Embrace the possibilities—your new, tailored e-commerce solution awaits!