This article will provide a step-by-step guide on adding and changing your Multisite Network’s unique domain.
Multisite installations are generally not recommended with WPX because every website hosted here has dedicated resources. In the case of Multisite installations, all websites under the main website of the Multisite Installation will share the same resources i.e. the resources intended for one website will be spread across many sites.
You can find more on how to set up a Multisite installation with that option from here.
Step 1. Log in to your WPX account
Begin by logging into your WPX account. You can do this by visiting the WPX login page.
Step 2. Go to Control Panel
Once logged in:
- Locate your hosting plan in the WPX client area.
- Click the Control Panel button next to the plan you wish to manage.

Step 3. Create Alias
Within the Control Panel:
- Sеlect +Create Website
- Then click on the Empty or Alias Site block from the installation wizard.

Under Type select Alias of, and then select the parent domain (your multisite main site). Fill in the new domain (site) you want to add to the multisite network.
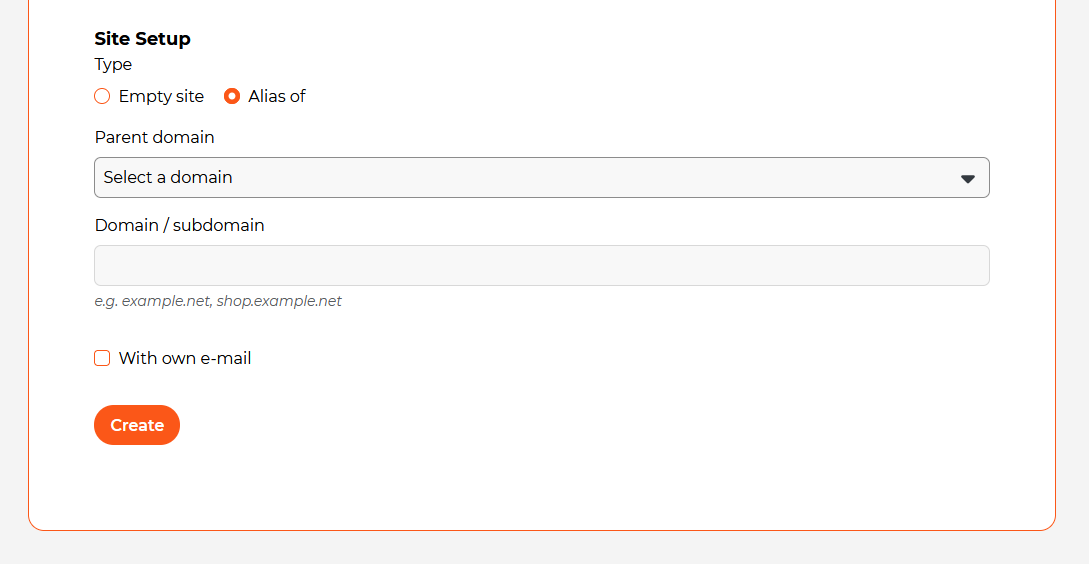
As an optional setting, you can enable this website to have its own email service.
Click the Create button to add the Alias site to your hosting plan.
Step 4. Create a unique domain for the Multisite Network
Once you’ve created the Alias in your WPX Panel, you can proceed with the actual setup in your Multisite Network.
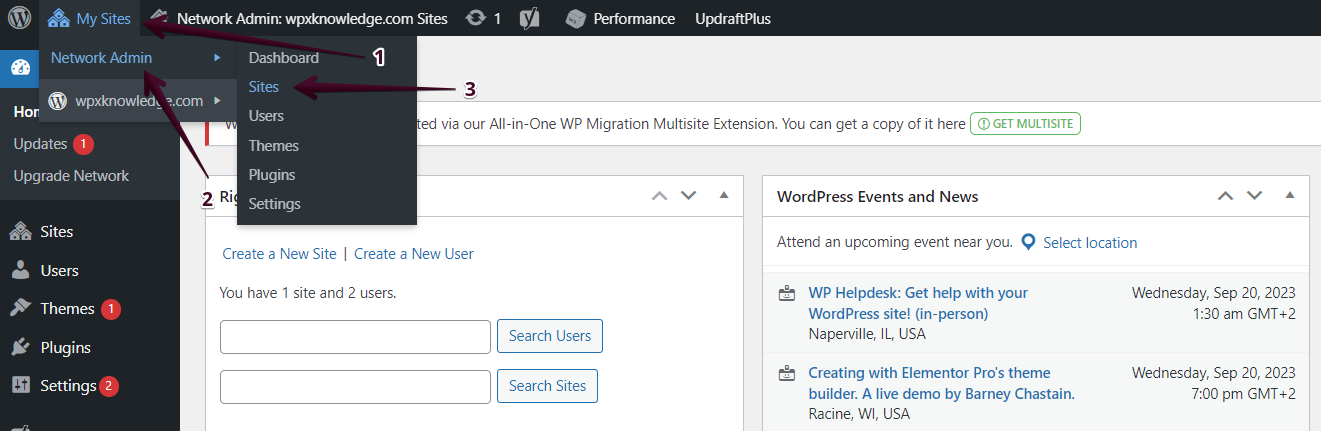
After you log in to your WP-admin area, go to My Sites (1) → Network Admin (2) → Sites (3).
From there, you will need to select Add New:

Now you will need to input all the information for the new domain in your Network:
- Site Address (URL)
- Site Title
- Site Language
- Admin Email
Once you are done, you need to select Add Site to finish the setup:

Step 5. Rename the domain
The next step would be to rename the desired domain that you would like to use. To do that, in your WordPress admin dashboard, go to My Sites (1) → Network Admin (2) → Sites (3).
Then you need to select Edit to make changes to the newly added site.

From there, you need to simply rename it to whatever URL you wish. Once you are done, you need to select Save Changes.

Step 6. Point the Alias to WPX
The last step for finishing the entire process includes pointing your Alias to our servers, so it can start loading on the web.
You can use our article for more information about pointing a certain domain to WPX Servers.
If you get stuck with anything discussed on this page, please get in touch with the WPX Support Team via live chat (use the bottom right-hand widget) and they will respond and help within 30 seconds or less.